
Cheesy Bread Made from Cheese:
Cheesy Bread Made from Cheese: The Ultimate Low-Carb, Gluten-Free Comfort Food
If there is one recipe that proves comfort food does not have to be complicated, this cheesy bread is it. Made with just a handful of simple ingredients, this rich, savory bread delivers everything you crave from traditional cheesy bread — crisp edges, a soft and chewy center, and deep, satisfying flavor — without flour, yeast, or lengthy prep time. It is one of those recipes that surprises people the first time they try it, because it feels indulgent while being incredibly easy to make.
This cheesy bread has been making the rounds online for a reason. It is quick, reliable, endlessly customizable, and frankly addictive. Once it comes out of the oven, golden and bubbling, it is very hard not to eat the entire pan. Whether you are following a low-carb lifestyle, avoiding gluten, or simply looking for a fast and delicious snack or side dish, this recipe deserves a permanent place in your rotation.
Even better, this recipe doubles beautifully as a pizza crust, opening the door to endless meal possibilities. From a simple snack to a full dinner base, this cheesy bread adapts to whatever you need it to be.
Why This Cheesy Bread Is So Popular
There are countless bread recipes online, but this one stands out for several reasons:
First, it requires only four main ingredients. No specialty flours, no rising time, and no complicated techniques. If you can mix ingredients in a bowl, you can make this bread.
Second, it is fast. From start to finish, this recipe takes about 15 minutes in the oven and just a few minutes of prep time. That makes it perfect for busy weeknights, last-minute cravings, or when you need something impressive without much effort.
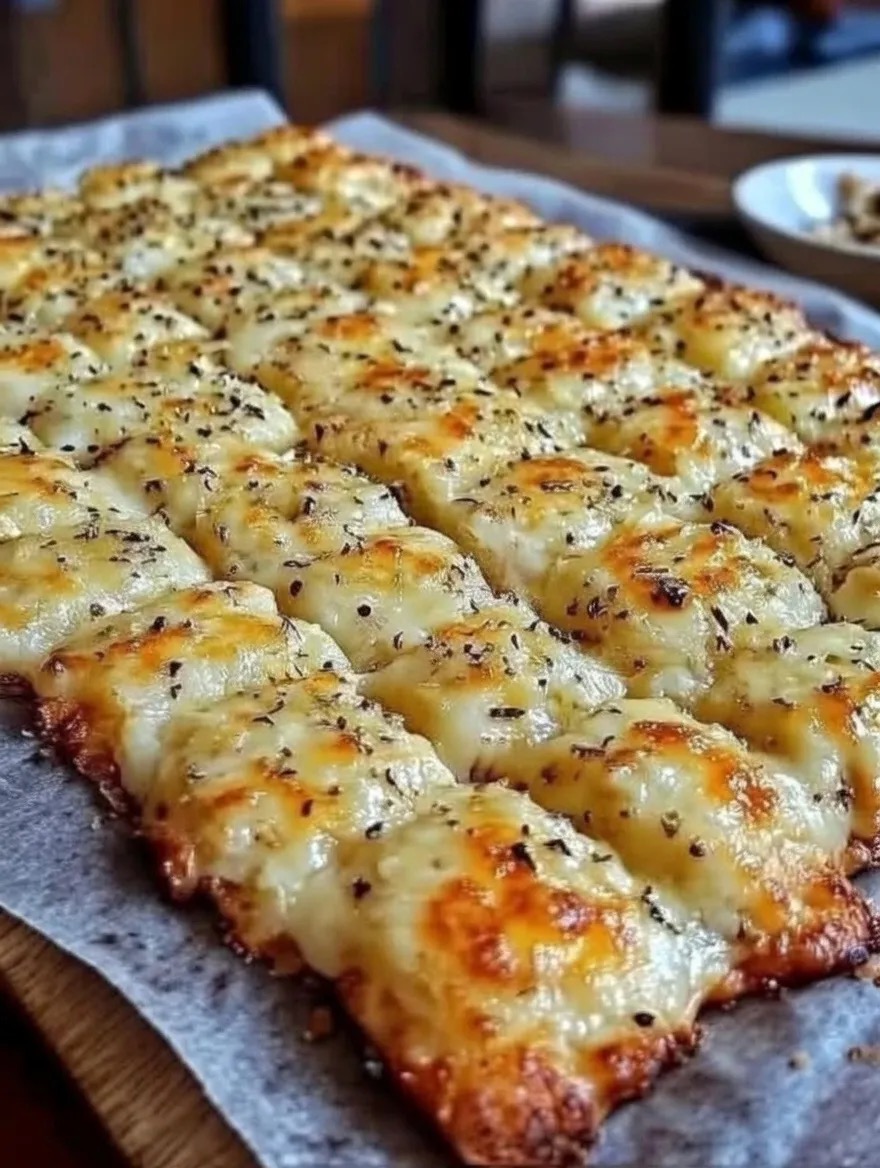
Third, the flavor is outstanding. Mozzarella brings stretch and chew, Parmesan adds sharpness and depth, and the egg binds everything together while creating structure. Garlic powder and Italian seasoning elevate the flavor, giving the bread that familiar, irresistible aroma that fills the kitchen as it bakes.
Finally, it is incredibly versatile. You can eat it on its own, dip it in marinara, serve it alongside soups and salads, or use it as a pizza crust. Few recipes manage to be this flexible while remaining so simple.
Ingredients Overview
This recipe works because each ingredient plays an important role. Understanding what each component does will help you achieve the best results every time.
Mozzarella Cheese – 1 Cup
Mozzarella is the backbone of this recipe. It provides the signature stretch, chew, and mild creaminess that makes this bread feel indulgent. Low-moisture shredded mozzarella works best, as fresh mozzarella contains too much liquid and can make the bread soggy.
For best results:
- Use low-moisture, part-skim mozzarella
- Avoid pre-shredded cheese if possible, as it often contains anti-caking agents
- If using pre-shredded cheese, the recipe will still work, but freshly shredded mozzarella melts more smoothly
Parmesan Cheese – 1 Cup
Parmesan adds depth and sharpness that balances the mild mozzarella. It also helps the bread brown and crisp around the edges.
Freshly grated Parmesan is ideal, but finely grated store-bought Parmesan will also work. Avoid shelf-stable powdered Parmesan, as it does not melt the same way and lacks the necessary fat content.
Egg – 1 Large
The egg acts as the binder, holding the cheese together and giving the bread structure. Without it, the cheese would melt and spread too much. The egg allows the mixture to bake into a cohesive, sliceable bread.
Use a large egg at room temperature for best mixing.
Seasonings
- Garlic powder, to taste
- Italian seasoning, to taste
These seasonings add aroma and savory depth without overpowering the cheese. You can adjust the quantities depending on your preference, but a light, even sprinkle is usually perfect.
Optional additions:
- Onion powder
- Crushed red pepper flakes
- Dried basil or oregano
- Black pepper
Equipment You Will Need
One of the best things about this recipe is that it requires minimal equipment:
- Mixing bowl
- Spoon or spatula
- Baking sheet
- Parchment paper
- Non-stick cooking spray (such as PAM)
- Oven with broiler function
That’s it. No mixers, no special pans, no complicated tools.
Step-by-Step Instructions
Step 1: Preheat the Oven
Preheat your oven to 350 degrees Fahrenheit. Make sure the oven is fully heated before baking, as consistent heat is important for even cooking and proper browning.
Step 2: Prepare the Baking Sheet
Line a baking sheet with parchment paper. Lightly spray the parchment paper with non-stick cooking spray. This step is crucial, as melted cheese can stick aggressively if the surface is not well-prepared.
Do not skip the parchment paper. Aluminum foil or an unlined pan will almost certainly result in sticking.
Step 3: Mix the Ingredients
In a medium mixing bowl, combine:
- 1 cup mozzarella cheese
- 1 cup Parmesan cheese
- 1 large egg
Mix thoroughly until the egg is fully incorporated and the cheese mixture becomes thick and slightly sticky. You want everything evenly distributed so the bread bakes uniformly.
Once mixed, sprinkle garlic powder and Italian seasoning over the mixture. Stir again to ensure the seasoning is evenly dispersed.
Step 4: Shape the Bread
Transfer the cheese mixture onto the prepared baking sheet. Use the back of a spoon or spatula to spread it into your desired shape.
You can make:
- A round shape for a pizza crust
- A rectangular shape for breadsticks or slices
- A rustic free-form shape for a more casual presentation
Aim for an even thickness, about ¼ to ½ inch thick. Thinner areas will crisp more, while thicker areas will stay softer.
Step 5: Bake
Place the baking sheet in the preheated oven and bake for 12 to 15 minutes.
Check at the 12-minute mark. The bread is ready for the next step when:
- The edges are starting to turn golden brown
- The center looks set and no longer glossy
Ovens vary, so use visual cues rather than relying strictly on time.
Step 6: Broil for Extra Browning
Once the edges have begun to brown, switch the oven to broil. Broil for approximately 1 minute.
Watch carefully during this step. Cheese can go from perfectly golden to burned very quickly under the broiler.
Remove the bread as soon as the top develops a deeper golden color with slightly crisped spots.
Step 7: Cool Slightly and Serve
Allow the cheesy bread to cool for 3 to 5 minutes before slicing. This short resting time helps the bread firm up and makes it easier to cut cleanly.
Slice into squares, strips, or wedges and serve warm.
Flavor and Texture Expectations
This cheesy bread has a crisp, golden exterior with a soft, chewy interior. The mozzarella creates stretch, while the Parmesan provides savory depth and a slightly nutty finish. The garlic and Italian seasoning enhance the flavor without overpowering the cheese.
It is rich, satisfying, and very easy to overeat — which is part of its charm.
Using This Recipe as a Pizza Crust
One of the most popular ways to enjoy this cheesy bread is as a pizza crust. It holds toppings surprisingly well and delivers all the satisfaction of pizza without traditional dough.
How to Turn It Into a Pizza Crust
- Shape the mixture into a round or oval crust on the parchment-lined baking sheet.
- Bake at 350 degrees until the edges begin to brown.
- Broil briefly, then remove from the oven.
- Add pizza sauce, cheese, and desired toppings.
- Return to the oven and bake until the toppings are hot and bubbly.
Best Pizza Toppings for This Crust
Because the crust itself is rich, lighter toppings work best:
- Marinara or pizza sauce
- Fresh mozzarella or shredded mozzarella
- Pepperoni
- Cooked sausage
- Mushrooms
- Olives
- Bell peppers
- Fresh basil added after baking
Avoid overloading the crust with heavy toppings, as this can make it difficult to hold together.
Serving Suggestions
This cheesy bread pairs well with a wide range of dishes:
- Served alongside soups such as tomato, minestrone, or chicken soup
- Paired with a fresh green salad
- Dipped in marinara, ranch, or garlic butter
- Served as an appetizer at gatherings
- Used as a base for sandwiches or open-faced melts
It also works beautifully as a snack or late-night comfort food.
Storage and Reheating
Storing Leftovers
If you somehow manage to have leftovers, store them in an airtight container in the refrigerator for up to 3 days.
Reheating
For best texture, reheat in:
- An oven at 350 degrees for 5 to 7 minutes
- An air fryer for 3 to 5 minutes
Avoid microwaving if possible, as it can make the bread rubbery.
Common Mistakes to Avoid
- Skipping parchment paper
- Using fresh mozzarella with too much moisture
- Overbaking before broiling
- Walking away during the broil step
- Cutting immediately without letting the bread rest
Avoiding these mistakes will ensure consistent results every time.
Customization Ideas
This recipe is a blank canvas for creativity. Try adding:
- Crumbled bacon
- Chopped jalapeños
- Sun-dried tomatoes
- Everything bagel seasoning
- Smoked paprika
You can also experiment with different cheese combinations, such as adding provolone or asiago, as long as mozzarella remains the primary cheese for structure.
Why You Will Keep Coming Back to This Recipe
This cheesy bread is more than just a viral recipe. It is practical, reliable, and deeply satisfying. It requires minimal effort and rewards you with maximum flavor. It fits into many dietary preferences, adapts to different meals, and never feels like a compromise.
Once you make it, you will understand why people warn about overeating it. It is warm, cheesy, savory, and comforting in the best possible way.
Final Thoughts
This cheesy bread proves that sometimes the simplest recipes are the most powerful. With just cheese, an egg, and a few seasonings, you can create something that feels indulgent, special, and endlessly versatile.
Whether you enjoy it as a snack, serve it to guests, or turn it into a pizza crust, this recipe is bound to become a favorite. Make it once, and it will be hard not to make it again — and again.