
Old-Fashioned Fudge: A Timeless Candy Recipe Made the Traditional Way
There are few homemade sweets as deeply nostalgic and universally loved as old-fashioned fudge. Long before candy thermometers, condensed milk shortcuts, and microwave methods became popular, fudge was made with nothing more than sugar, cocoa, milk, butter, patience, and a strong arm for stirring. This recipe is a true throwback to that era, the kind of fudge that was made on stovetops in well-worn saucepans, poured into buttered pans, and cut into neat squares once set. It is rich, chocolatey, smooth, and intensely satisfying, delivering a flavor and texture that modern shortcuts simply cannot replicate.
Old-fashioned fudge is more than just a dessert. It is a memory. For many families, it brings to mind holidays, church gatherings, school fundraisers, and afternoons spent watching someone patiently stir a bubbling pot on the stove. It is the kind of recipe that was memorized rather than written down, passed from one generation to the next with instructions like “stir until it looks right” or “don’t stop stirring or it’ll grain.” This version stays true to that spirit while offering clear guidance so even first-time candy makers can achieve excellent results.
What makes this recipe especially appealing is its simplicity. With just a handful of pantry staples and less than twenty minutes of active cooking time, you can create a batch of classic chocolate fudge that rivals anything from a specialty candy shop. There is no need for marshmallows, sweetened condensed milk, or artificial flavorings. The flavor comes from real cocoa, real butter, and proper technique.
This article will walk you through the process step by step, explaining not only how to make the fudge, but why each step matters. You will also find helpful tips for success, variations, storage advice, and serving ideas, making this recipe ideal for a website audience looking for both tradition and reliability.
Why Old-Fashioned Fudge Still Matters
In an age where desserts are often about speed and convenience, old-fashioned fudge stands apart. It requires attention, patience, and a willingness to engage with the cooking process. But that effort is rewarded with a texture and flavor that simply cannot be achieved through shortcuts.
Traditional fudge relies on controlled boiling and careful stirring to create its signature smoothness. The sugar dissolves fully, the cocoa blooms in the heat, and the milk and butter combine to create a rich, cohesive mixture. When finished properly, the fudge sets with a firm yet creamy bite, never crumbly and never sticky.
This recipe also represents a more economical and accessible approach to candy making. The ingredients are inexpensive and widely available, making it possible to prepare a generous batch without specialized equipment. This accessibility is part of what made fudge such a popular homemade treat in the past and why it remains beloved today.
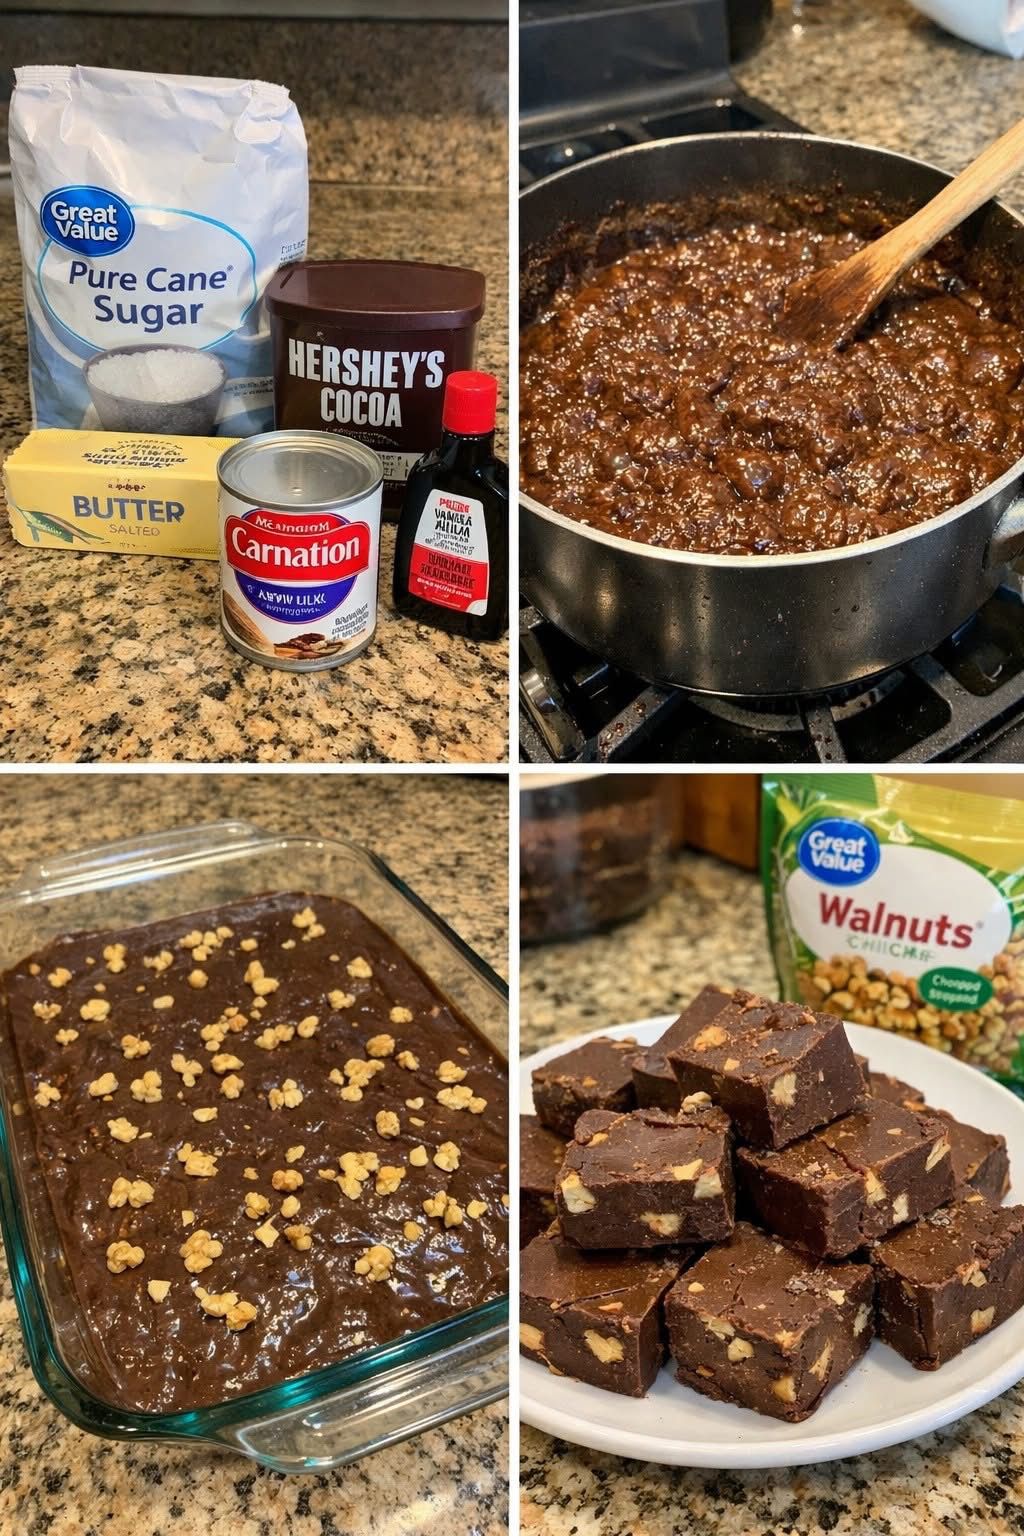
Ingredient Breakdown and Their Roles
Although the ingredient list is short, each component plays an essential role in the success of the fudge.
Granulated sugar forms the structure of the fudge. When heated with liquid, it dissolves and later recrystallizes in a controlled way to create the firm yet smooth texture. Accurate measuring is important, as too much or too little sugar can affect the final consistency.
Hershey’s cocoa powder provides the chocolate flavor. Using a familiar, well-balanced cocoa ensures a classic chocolate taste without bitterness. The cocoa also contributes to the fudge’s color and depth of flavor. Sifting the cocoa before mixing helps prevent lumps.
Salted butter adds richness and helps control sugar crystallization. The fat coats sugar molecules, contributing to the smooth texture. Using salted butter enhances the chocolate flavor and balances the sweetness. If using unsalted butter, a small pinch of salt may be added.
Evaporated milk supplies moisture and milk solids without excess water. This concentrated milk helps create a creamy texture and allows the fudge to cook properly without becoming thin or grainy. Carnation evaporated milk is a traditional choice and delivers consistent results.
Vanilla extract is added at the end to preserve its aroma and flavor. It rounds out the chocolate and adds warmth. Adding it after cooking prevents the flavor from evaporating during boiling.
Nuts are optional but traditional. Chopped walnuts or pecans add texture and contrast, making the fudge heartier and more complex. They should be added after cooking so they remain evenly distributed.
Preparing to Make Fudge
Before turning on the stove, it is important to prepare your workspace. Fudge cooks quickly once it begins boiling, and uninterrupted stirring is essential. Measure all ingredients in advance and have them ready within reach.
Choose a heavy-bottomed saucepan to ensure even heat distribution. Thin pans can cause hot spots, increasing the risk of scorching. A wooden spoon or heat-resistant spatula is ideal for stirring, as it allows you to scrape the bottom and sides of the pan effectively.
Prepare a baking dish by generously buttering it. This prevents sticking and makes it easier to remove and cut the fudge once set. Set the dish aside so it is ready when the fudge is finished.
Mixing and Cooking the Fudge
Begin by combining the sugar and cocoa powder in the saucepan. Mixing them while dry ensures the cocoa is evenly distributed and helps prevent clumping once the liquid is added. This step is small but important for a smooth final texture.
Add the stick of butter and the can of evaporated milk to the pan. Place the pan over medium heat and begin stirring immediately. As the mixture heats, the butter will melt and the sugar will begin to dissolve. Continuous stirring at this stage helps everything combine evenly and prevents scorching.
As the mixture approaches a boil, it will become glossy and slightly thicker. Once it begins to boil, reduce the heat slightly to maintain a steady, controlled boil rather than a vigorous one. From this point, timing becomes important.
Stir continuously for seven minutes. This constant motion keeps the mixture smooth and ensures even cooking. During this time, the fudge will darken slightly and thicken. It should bubble steadily but not violently. Scrape the bottom and corners of the pan regularly to prevent sticking.
This stage is where traditional fudge making truly shines. The combination of heat, sugar, and milk is creating the structure that will allow the fudge to set properly. Skipping or shortening this step can result in fudge that is too soft or grainy.
Finishing the Fudge
After seven minutes of boiling and stirring, remove the pan from heat. Immediately add the vanilla extract and stir vigorously. This helps incorporate air and begins the cooling process. Continue stirring continuously for about three minutes.
During this final stirring, the fudge will begin to lose some of its glossy sheen and thicken noticeably. This change in appearance is a key indicator that the fudge is ready to be poured. If nuts are being used, fold them in during this stage, ensuring they are evenly distributed.
Pour the fudge into the prepared buttered baking dish. Use the spoon or spatula to spread it evenly, working quickly before it begins to set. Do not overwork the surface, as this can affect the final texture.
Allow the fudge to cool at room temperature until fully set. Avoid refrigerating it during this stage, as rapid cooling can cause cracking or uneven texture.
Cutting and Serving
Once the fudge is completely set, cut it into squares using a sharp knife. For clean cuts, wipe the blade between slices. The fudge should hold its shape while remaining smooth and creamy when bitten into.
Serve the fudge as a standalone treat, alongside coffee or tea, or as part of a dessert platter. It is rich and satisfying, so small portions go a long way.
This fudge is especially popular during holidays and special occasions, but it is just as enjoyable made on an ordinary day. Its quick preparation time makes it an excellent choice when you want a homemade treat without a long commitment.
Storage and Shelf Life
Old-fashioned fudge stores well when kept properly. Once set and cut, store it in an airtight container at room temperature for several days. If stacking pieces, place parchment or wax paper between layers to prevent sticking.
For longer storage, fudge can be refrigerated, though it should be brought back to room temperature before serving for the best texture and flavor. It can also be frozen for extended storage. Wrap pieces tightly and store in a freezer-safe container. Thaw slowly at room temperature.
Variations and Flavor Ideas
While classic chocolate fudge is hard to beat, this recipe can be adapted in subtle ways without losing its old-fashioned charm. Adding chopped nuts is the most common variation, providing texture and richness.
For a deeper chocolate flavor, a small amount of espresso powder can be added to the cocoa and sugar mixture. This enhances the chocolate without making the fudge taste like coffee.
A swirl of peanut butter added after cooking creates a marbled effect and adds a nostalgic twist. Simply spoon warmed peanut butter over the poured fudge and gently swirl with a knife.
For a holiday version, a small amount of peppermint extract can replace part of the vanilla, creating a festive chocolate-mint fudge.
Why This Recipe Endures
The reason old-fashioned fudge remains beloved is simple. It works. It delivers rich flavor, satisfying texture, and a sense of accomplishment that modern shortcuts cannot match. It connects us to the past while remaining perfectly suited to modern kitchens.
This recipe is especially valuable for a website because it appeals to readers seeking tradition, authenticity, and reliable results. It tells a story, invites participation, and offers a reward that feels both indulgent and heartfelt.
Final Thoughts
Old-fashioned fudge is a reminder that great recipes do not need to be complicated. With just a few ingredients, careful attention, and a bit of patience, you can create a treat that feels special every time. Whether you are making it for family, friends, or simply for yourself, this fudge delivers comfort, nostalgia, and undeniable chocolate satisfaction.
This is the kind of recipe that becomes part of a family’s story, made again and again, shared freely, and remembered fondly. Once you master it, you will understand why it has stood the test of time.