
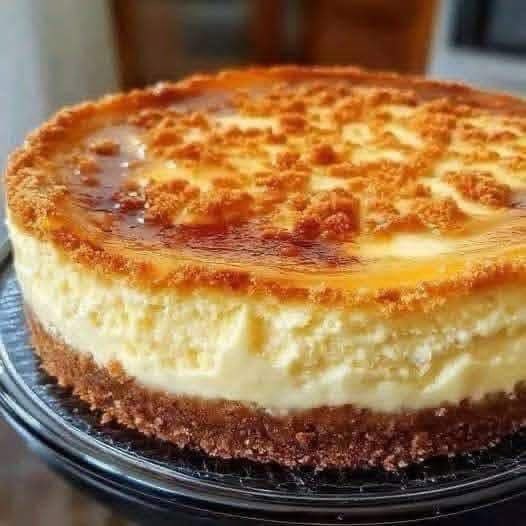
Lotus Biscoff Caramel Cheesecake
Introduction
Few desserts inspire as much devotion as a perfectly made cheesecake. Rich, creamy, and indulgent, cheesecake has earned its place as one of the most beloved desserts around the world. When that classic dessert is paired with the warm, spiced caramelized flavor of Lotus Biscoff, the result is a show-stopping dessert that feels luxurious, comforting, and unforgettable.
This Lotus Biscoff Caramel Cheesecake combines a buttery spiced cookie crust, a silky smooth vanilla cheesecake filling, and a generous swirl of melted Biscoff spread for depth and richness. Finished with crushed cookies and caramelized notes throughout, this cheesecake is perfect for special occasions, holidays, celebrations, or whenever you want to impress guests with a bakery-quality dessert made at home.
In this comprehensive guide, you will learn not only how to prepare this cheesecake step by step, but also the techniques behind achieving the perfect texture, avoiding cracks, enhancing flavor, and storing or freezing cheesecake successfully. Whether you are a beginner baker or an experienced dessert enthusiast, this recipe is designed to deliver consistent, professional results.
Why Lotus Biscoff Works So Well in Cheesecake
Lotus Biscoff cookies are known for their unique flavor profile: caramelized sugar, warm spices, and a subtle toasted note that sets them apart from traditional cookies. When crushed and combined with butter, they create an exceptionally flavorful crust that requires no additional spices or sweeteners.
The Biscoff spread, made from the same cookies, melts into a smooth, pourable consistency that blends seamlessly into cheesecake batter. It adds sweetness, depth, and a slightly spiced caramel flavor that enhances the creaminess of the cheese without overpowering it.
Together, the cookies and spread elevate a classic cheesecake into a dessert that feels modern, indulgent, and deeply satisfying.
Ingredients Overview
This cheesecake is composed of three main components: the cookie crust, the cheesecake filling, and the Biscoff topping. Each plays a vital role in the final texture and flavor.
Crust Ingredients
- 25–30 Lotus Biscoff cookies, finely crushed
- 5 tablespoons unsalted butter, melted
The crust provides structure and contrast, offering a crisp, buttery base that balances the creamy filling.
Cheesecake Filling Ingredients
- 3 packages (8 oz each) cream cheese, softened
- 1 cup granulated sugar
- 1 cup sour cream
- 1 teaspoon vanilla extract
- 3 large eggs, room temperature
These ingredients form the heart of the cheesecake, creating a smooth, rich, and slightly tangy filling.
Biscoff Swirl and Topping
- ½ cup Lotus Biscoff spread, melted
- Extra crushed Lotus Biscoff cookies for topping
The spread adds caramelized flavor throughout the cheesecake, while the cookie topping provides texture and visual appeal.
Equipment You Will Need
- 9-inch springform pan
- Food processor or rolling pin (for crushing cookies)
- Large mixing bowl
- Hand mixer or stand mixer
- Rubber spatula
- Baking tray (for water bath, optional but recommended)
- Aluminum foil
Having the right equipment ensures a smooth baking process and professional-looking results.
Step-by-Step Instructions
Step 1: Preparing the Crust
Begin by preheating your oven to 325°F (165°C). Lightly grease a 9-inch springform pan and line the bottom with parchment paper if desired.
Crush the Lotus Biscoff cookies into fine crumbs using a food processor or by placing them in a sealed bag and crushing with a rolling pin. Transfer the crumbs to a bowl and pour in the melted butter. Mix until all crumbs are evenly coated and resemble wet sand.
Press the mixture firmly into the bottom of the prepared pan, using the bottom of a glass or measuring cup to create an even, compact layer. Bake the crust for 10 minutes, then remove from the oven and allow it to cool while you prepare the filling.
Pre-baking the crust helps it hold its shape and prevents sogginess once the filling is added.
Step 2: Preparing the Cheesecake Filling
In a large mixing bowl, beat the softened cream cheese on medium speed until smooth and free of lumps. This step is crucial for achieving a creamy texture, so take your time and scrape down the sides of the bowl as needed.
Gradually add the granulated sugar and continue mixing until fully incorporated. The mixture should look smooth and glossy.
Add the sour cream and vanilla extract, mixing on low speed until just combined. Sour cream adds tanginess and helps create a silky consistency.
Next, add the eggs one at a time, mixing on low speed after each addition. Avoid overmixing at this stage, as incorporating too much air can lead to cracks during baking.
Step 3: Incorporating the Biscoff Spread
Gently warm the Biscoff spread until it becomes pourable but not hot. Remove about one cup of the cheesecake batter and mix it with half of the melted Biscoff spread.
Pour the plain cheesecake batter over the cooled crust, smoothing the top with a spatula. Spoon the Biscoff-infused batter on top in several dollops. Use a knife or skewer to gently swirl the Biscoff mixture through the batter, creating a marbled effect.
This swirling technique ensures that the Biscoff flavor is evenly distributed while maintaining visual appeal.
Step 4: Baking the Cheesecake
Wrap the outside of the springform pan tightly with aluminum foil to prevent water from seeping in. Place the pan in a larger baking tray and carefully pour hot water into the tray, filling it halfway up the sides of the pan.
Bake the cheesecake at 325°F (165°C) for 55 to 65 minutes, or until the edges are set and the center still has a slight wobble.
Turn off the oven and crack the door open slightly. Allow the cheesecake to cool in the oven for 1 hour. This gradual cooling process reduces the risk of cracks forming on the surface.
Step 5: Cooling and Chilling
Remove the cheesecake from the water bath and let it cool completely at room temperature. Once cooled, cover and refrigerate for at least 6 hours, preferably overnight.
Chilling allows the cheesecake to fully set and develop its flavor and texture.
Step 6: Finishing Touches
Before serving, gently warm the remaining Biscoff spread and drizzle it over the top of the cheesecake. Sprinkle with extra crushed Lotus Biscoff cookies for added texture and presentation.
Carefully release the cheesecake from the springform pan, slice with a sharp knife wiped clean between cuts, and serve.
Tips for Cheesecake Success
- Always use room-temperature ingredients for a smooth batter.
- Mix on low speed once eggs are added to avoid incorporating excess air.
- Use a water bath for even baking and crack prevention.
- Chill the cheesecake thoroughly before slicing for clean cuts.
Flavor Variations and Customizations
This cheesecake can be easily adapted to suit different preferences:
- Add a layer of caramel sauce between the crust and filling
- Mix white chocolate chips into the batter
- Top with whipped cream for added lightness
- Create individual mini cheesecakes using a muffin pan
Each variation maintains the core Biscoff flavor while offering a unique twist.
Storage and Make-Ahead Instructions
Lotus Biscoff Caramel Cheesecake can be stored in the refrigerator for up to 5 days in an airtight container. It also freezes exceptionally well.
To freeze, wrap the chilled cheesecake tightly in plastic wrap and aluminum foil. Freeze for up to 2 months. Thaw overnight in the refrigerator before serving.
Why This Recipe Works
This recipe balances richness with structure, sweetness with tang, and creaminess with texture. The Biscoff crust provides a sturdy base, the cheesecake filling is smooth and luxurious, and the caramelized cookie spread adds a signature flavor that sets this dessert apart.
By following careful mixing and baking techniques, this cheesecake delivers consistent, bakery-quality results at home.
Conclusion
Lotus Biscoff Caramel Cheesecake is more than just a dessert; it is an experience of flavor, texture, and indulgence. With its spiced cookie crust, creamy filling, and caramelized finish, it is a dessert that leaves a lasting impression.
Whether you are creating content for a recipe website, preparing a dessert for a celebration, or simply indulging your love of cheesecake, this detailed guide ensures success from start to finish. Once you try it, this cheesecake is sure to become a favorite that you return to time and time again.