
Velvet Eggless Chocolate Mousse
A Complete Guide to Creating a Silky, Rich, and Airy Chocolate Dessert Without Eggs
Chocolate mousse is one of the most elegant and indulgent desserts in the world. Traditionally made with eggs, it is known for its light, airy texture and deep chocolate flavor. However, this eggless version delivers the same luxurious experience without the need for eggs, making it suitable for a wider range of dietary preferences while remaining just as decadent.
This velvet eggless chocolate mousse recipe focuses on simplicity, technique, and high-quality ingredients. By using chocolate, coconut milk or heavy cream, sugar, vanilla, and a pinch of salt, you can create a dessert that is smooth, rich, and perfectly balanced. The result is a mousse that melts effortlessly in your mouth while offering a deep, satisfying chocolate flavor.
In this comprehensive guide, you will learn every step of the process, along with tips, variations, and techniques to ensure your mousse turns out perfect every time.
What Makes This Mousse Special
Eggless chocolate mousse relies on whipped cream or coconut milk to create its airy structure instead of whipped egg whites or yolks. This method produces a texture that is slightly denser but still incredibly smooth and light.
The key to success lies in the balance between melted chocolate and whipped cream. Too much chocolate can make the mousse heavy, while too much cream can dilute the flavor. Achieving the right ratio creates a dessert that is both rich and airy.
Another important factor is temperature control. Properly cooling the chocolate before folding it into the cream ensures a smooth, lump-free mousse.
Ingredients
Base Ingredients
- 200 g dark or milk chocolate, chopped
- 1 cup coconut milk (chilled) or heavy cream
- 2 to 3 tablespoons sugar (adjust to taste)
- 1 teaspoon vanilla extract
- Pinch of salt
Choosing the Right Chocolate
The chocolate you use will define the flavor of your mousse.
Dark chocolate provides a rich, intense taste with slight bitterness, making it ideal for those who prefer a more sophisticated dessert.
Milk chocolate creates a sweeter, creamier mousse that is more approachable and lighter in flavor.
For best results, choose high-quality chocolate with a good cocoa content. Avoid chocolate chips if possible, as they often contain stabilizers that can affect melting.
Coconut Milk vs Heavy Cream
This recipe offers flexibility depending on your preference.
Coconut milk creates a dairy-free version with a subtle coconut flavor. It should be well chilled before use so that it can be whipped properly.
Heavy cream produces a classic, rich mousse with a neutral flavor that allows the chocolate to shine.
Both options work beautifully, so choose based on your dietary needs and taste preference.
Step 1: Preparing the Chocolate
Place the chopped chocolate in a heatproof bowl.
Melt it using a double boiler or in the microwave in short intervals, stirring between each interval until smooth.
Be careful not to overheat the chocolate, as this can cause it to seize. Once melted, set it aside to cool slightly. It should be warm but not hot when combined with the cream.
Step 2: Whipping the Cream or Coconut Milk
If using heavy cream, pour it into a chilled bowl and whip it until soft peaks form.
If using coconut milk, scoop out the solid portion from a chilled can and whip it until smooth and fluffy.
Add the sugar, vanilla extract, and a pinch of salt while whipping. Continue until soft peaks form.
Soft peaks are important because they create a light texture without making the mousse too stiff.
Step 3: Combining Chocolate and Cream
Take a small portion of the whipped cream and mix it into the melted chocolate. This step lightens the chocolate and makes it easier to fold.
Next, gently fold the chocolate mixture into the remaining whipped cream.
Use a spatula and fold carefully, turning the mixture from the bottom up. Avoid stirring too vigorously, as this can deflate the mousse.
The goal is to maintain as much air as possible while achieving a smooth, uniform mixture.
Step 4: Adjusting Flavor
Taste the mousse and adjust sweetness if needed.
If using dark chocolate, you may want to add a bit more sugar. If using milk chocolate, you may not need additional sweetness.
The pinch of salt helps enhance the chocolate flavor and balance the sweetness.
Step 5: Chilling the Mousse
Spoon the mousse into serving glasses or bowls.
Cover and refrigerate for at least 2 to 3 hours, or until set.
Chilling allows the mousse to firm up and develop its signature texture.
Step 6: Serving
Once chilled, the mousse is ready to serve.
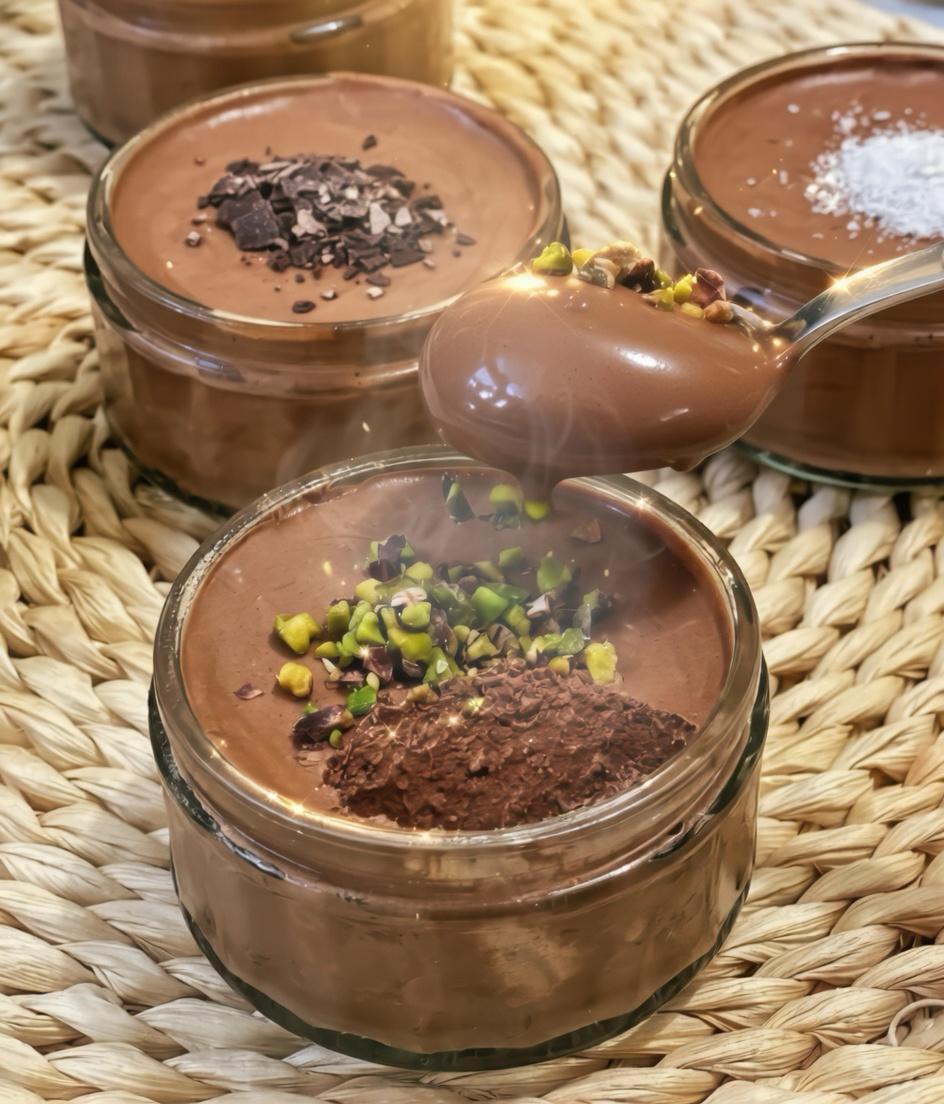
You can enjoy it as is or add simple garnishes such as:
Whipped cream
Chocolate shavings
Fresh berries
A dusting of cocoa powder
Serve chilled for the best texture and flavor.
Tips for Perfect Mousse
Use high-quality chocolate for the best flavor
Ensure the chocolate is not too hot when mixing
Whip the cream to soft peaks, not stiff peaks
Fold gently to maintain airiness
Chill thoroughly before serving
Common Mistakes to Avoid
Overheating the chocolate
Overwhipping the cream
Mixing too aggressively
Skipping the chilling step
Using low-quality ingredients
Avoiding these mistakes will help ensure a smooth and creamy result.
Flavor Variations
This recipe can be adapted in many ways to suit your preferences.
Coffee Chocolate Mousse
Add a teaspoon of instant coffee to the melted chocolate for a deeper flavor.
Orange Chocolate Mousse
Incorporate a small amount of orange zest for a fresh, citrusy note.
Spiced Chocolate Mousse
Add a pinch of cinnamon or chili powder for warmth and complexity.
Vegan Version
Use coconut milk and dairy-free chocolate for a completely plant-based dessert.
Texture Adjustments
If you prefer a lighter mousse, whip the cream slightly less and fold gently.
For a denser mousse, increase the chocolate slightly or chill for a longer period.
Understanding how each component affects the texture allows you to customize the dessert to your liking.
Storage and Shelf Life
Store the mousse in the refrigerator, covered, for up to 3 days.
Because it contains cream or coconut milk, it should be kept chilled at all times.
Stirring is not recommended after it has set, as this can affect the texture.
Serving Ideas
Chocolate mousse is versatile and can be presented in many ways.
Serve in elegant glasses for a formal dessert
Layer with crushed cookies for added texture
Use as a filling for cakes or pastries
Pair with fruit for a balanced dish
Why This Recipe Works
This eggless chocolate mousse works because it balances richness and airiness through careful technique.
The melted chocolate provides structure and flavor, while the whipped cream introduces lightness. Folding the two together creates a smooth, cohesive mixture that sets beautifully when chilled.
The addition of vanilla and salt enhances the chocolate, creating a more complex and satisfying flavor profile.
Final Thoughts
Velvet eggless chocolate mousse proves that you do not need eggs to create a luxurious dessert. With just a few ingredients and the right technique, you can achieve a result that is rich, smooth, and perfectly balanced.
This recipe is simple enough for beginners yet refined enough to impress guests. It is a dessert that feels special, whether served at a dinner party or enjoyed as a personal treat.
By following this guide, you can master the art of eggless mousse and create a dessert that is both elegant and deeply satisfying.
Take your time, focus on the details, and enjoy the process. The reward is a silky, chocolatey creation that delivers pure indulgence in every spoonful.