
Cheesy Beef Puff Pastry Pockets
A Complete Guide to Golden, Flaky Pastry Filled with Savory Beef and Melted Cheese
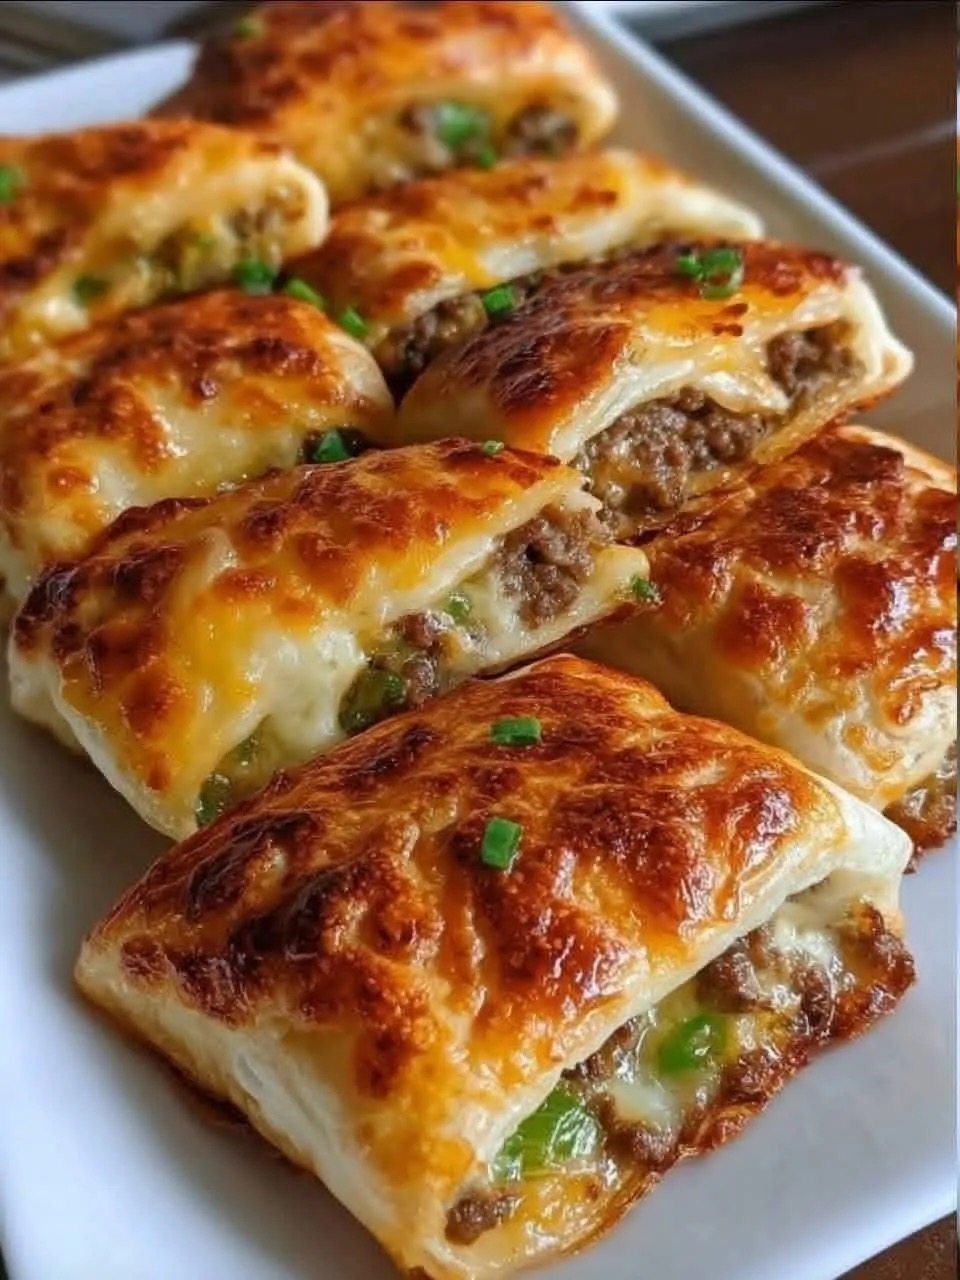
There is something undeniably satisfying about biting into a perfectly baked puff pastry pocket. The delicate, flaky layers shatter gently with each bite, revealing a warm, savory filling inside. These cheesy beef puff pastry pockets combine rich, seasoned ground beef with melted cheese, all wrapped in buttery pastry that bakes to golden perfection.
Whether you are preparing a quick snack, a lunchbox favorite, or an elegant appetizer for guests, this recipe delivers both flavor and versatility. It is easy enough for beginners yet refined enough to impress, making it a reliable addition to any home cook’s repertoire.
In this detailed guide, you will learn everything from preparing the filling to handling puff pastry correctly, ensuring your pastry pockets turn out crisp, flavorful, and beautifully golden every time.
Why Puff Pastry Pockets Are So Popular
Puff pastry is beloved for its light, airy layers and crisp texture. When baked, the dough expands and creates delicate layers that feel almost weightless.
Combining this pastry with a hearty filling like seasoned beef and cheese creates a perfect contrast. The crisp exterior gives way to a warm, savory interior that is both comforting and satisfying.
Another reason for their popularity is convenience. Puff pastry is widely available and easy to use, allowing you to create impressive dishes without starting from scratch.
Ingredients
For the Pastry
- 2 sheets puff pastry, thawed
For the Filling
- 300 g ground beef
- 1 small onion, finely chopped
- 2 cloves garlic, minced
- 1 cup shredded cheese (cheddar or mozzarella)
- 2 tablespoons chopped green onions
- 1 teaspoon paprika
- Salt and black pepper to taste
Optional Additions
- 1/2 teaspoon cumin or chili powder for extra depth
- 1 tablespoon tomato paste for richness
For Assembly
- 1 egg (for egg wash)
- 1 tablespoon milk or water
Understanding Puff Pastry
Puff pastry is made by layering butter and dough repeatedly, creating a structure that puffs up when baked. Proper handling is essential to maintain these layers.
Always keep puff pastry cold. If it becomes too warm, the butter layers can melt before baking, resulting in less rise and a denser texture.
Work quickly and return the pastry to the refrigerator if it becomes soft.
Step 1: Preparing the Filling
Heat a skillet over medium heat and add the ground beef.
Cook the beef, breaking it apart with a spoon, until it begins to brown.
Add the chopped onion and cook until softened and translucent. Stir in the minced garlic and cook for another minute until fragrant.
Season the mixture with paprika, salt, and black pepper. If using optional spices like cumin or chili powder, add them at this stage.
If you want a richer filling, stir in a small amount of tomato paste and cook for a couple of minutes.
Remove the mixture from heat and allow it to cool slightly. Cooling is important because hot filling can melt the pastry and make it difficult to handle.
Step 2: Adding Cheese and Herbs
Once the beef mixture has cooled, stir in the shredded cheese and chopped green onions.
The residual heat will slightly melt the cheese, helping it blend into the filling without becoming overly runny.
This step ensures every bite is evenly cheesy and flavorful.
Step 3: Preparing the Puff Pastry
Lightly flour your work surface and roll out the thawed puff pastry sheets if needed.
Cut each sheet into four equal squares, giving you a total of eight pieces.
Keep the pastry pieces chilled until ready to use.
Step 4: Filling the Pastry
Place a portion of the beef and cheese mixture in the center of each pastry square.
Avoid overfilling, as this can make sealing difficult and cause leaks during baking.
Step 5: Shaping the Pockets
Fold each square over to form a triangle or rectangle, depending on your preference.
Press the edges together firmly, then use a fork to crimp the edges and seal completely.
This step not only secures the filling but also adds a decorative touch.
Step 6: Applying Egg Wash
In a small bowl, whisk together the egg and milk or water.
Brush the egg wash over the tops of the pastry pockets.
This helps them develop a golden, glossy finish during baking.
Step 7: Venting the Pastry
Using a sharp knife, cut a small slit or two on top of each pocket.
This allows steam to escape during baking, preventing the pastry from becoming soggy.
Step 8: Baking the Pockets
Preheat your oven to 200°C.
Place the pastry pockets on a baking sheet lined with parchment paper.
Bake for 18 to 22 minutes, or until the pastries are puffed and golden brown.
Keep an eye on them during the final minutes to ensure they do not overbrown.
Step 9: Cooling and Serving
Remove the pastry pockets from the oven and let them cool slightly before serving.
This allows the filling to set and prevents burns from hot cheese.
Serve warm for the best texture and flavor.
Tips for Perfect Puff Pastry Pockets
Keep the pastry cold at all times
Do not overfill the pockets
Seal the edges thoroughly
Use egg wash for a golden finish
Allow the filling to cool before assembling
Flavor Variations
These pastry pockets are highly customizable.
Spicy Beef Pockets
Add chili flakes or hot sauce to the filling.
Creamy Version
Mix in a spoonful of cream cheese for a richer filling.
Vegetable Addition
Add finely chopped bell peppers or mushrooms for extra texture.
Chicken Alternative
Replace ground beef with cooked shredded chicken.
Serving Suggestions
Cheesy beef puff pastry pockets pair well with a variety of sides and dips.
Serve with a fresh green salad
Pair with yogurt or garlic sauce
Add a side of roasted vegetables
Include in a party platter with other appetizers
Storage and Reheating
Store leftovers in an airtight container in the refrigerator for up to 3 days.
To reheat, place them in an oven at 180°C for 8 to 10 minutes to restore crispness.
Avoid microwaving, as it can make the pastry soft.
Freezing Instructions
These pastry pockets freeze well.
You can freeze them before baking or after baking.
For unbaked pockets, freeze on a tray, then transfer to a container. Bake directly from frozen, adding a few extra minutes to the cooking time.
Common Mistakes to Avoid
Using warm pastry
Overfilling the pockets
Skipping the egg wash
Not venting the pastry
Underbaking or overbaking
Avoiding these mistakes ensures a perfect result.
Why This Recipe Works
This recipe balances textures and flavors beautifully.
The flaky pastry provides a crisp exterior, while the beef filling offers richness and depth. The melted cheese adds creaminess and binds the filling together.
Each element complements the others, creating a dish that is both comforting and satisfying.
Making It Ahead
You can prepare the filling in advance and store it in the refrigerator.
Assemble the pockets just before baking for the best results.
This makes the recipe convenient for busy schedules or entertaining.
Final Thoughts
Cheesy beef puff pastry pockets are a perfect combination of simplicity and elegance. They are easy to prepare, versatile, and incredibly delicious.
With their golden, flaky crust and savory, cheesy filling, they are sure to become a favorite in your kitchen. Whether served as a snack, lunch, or appetizer, they deliver both comfort and flavor in every bite.
By following this detailed guide, you can create pastry pockets that are crisp, flavorful, and visually impressive.
Take your time, enjoy the process, and savor the satisfaction of making a dish that is as enjoyable to prepare as it is to eat.