
Strawberry Dessert Candle — A Complete Step-by-Step Guide to Creating Realistic Edible-Looking Candles
Creating a strawberry dessert candle is a beautiful and creative DIY project that blends artistry with functionality. These candles are designed to look like delicious layered desserts, complete with whipped cream textures and strawberry toppings, yet they are entirely decorative and meant for burning. This type of handmade candle has become very popular for social media content, gifting, and even small business ventures because of its aesthetic appeal and uniqueness.
In this detailed guide, you will learn everything you need to know about making a strawberry dessert candle from scratch. From choosing the right materials to mastering the whipped wax technique, this tutorial is designed to help beginners and intermediate crafters achieve professional-looking results.
What Is a Dessert Candle?
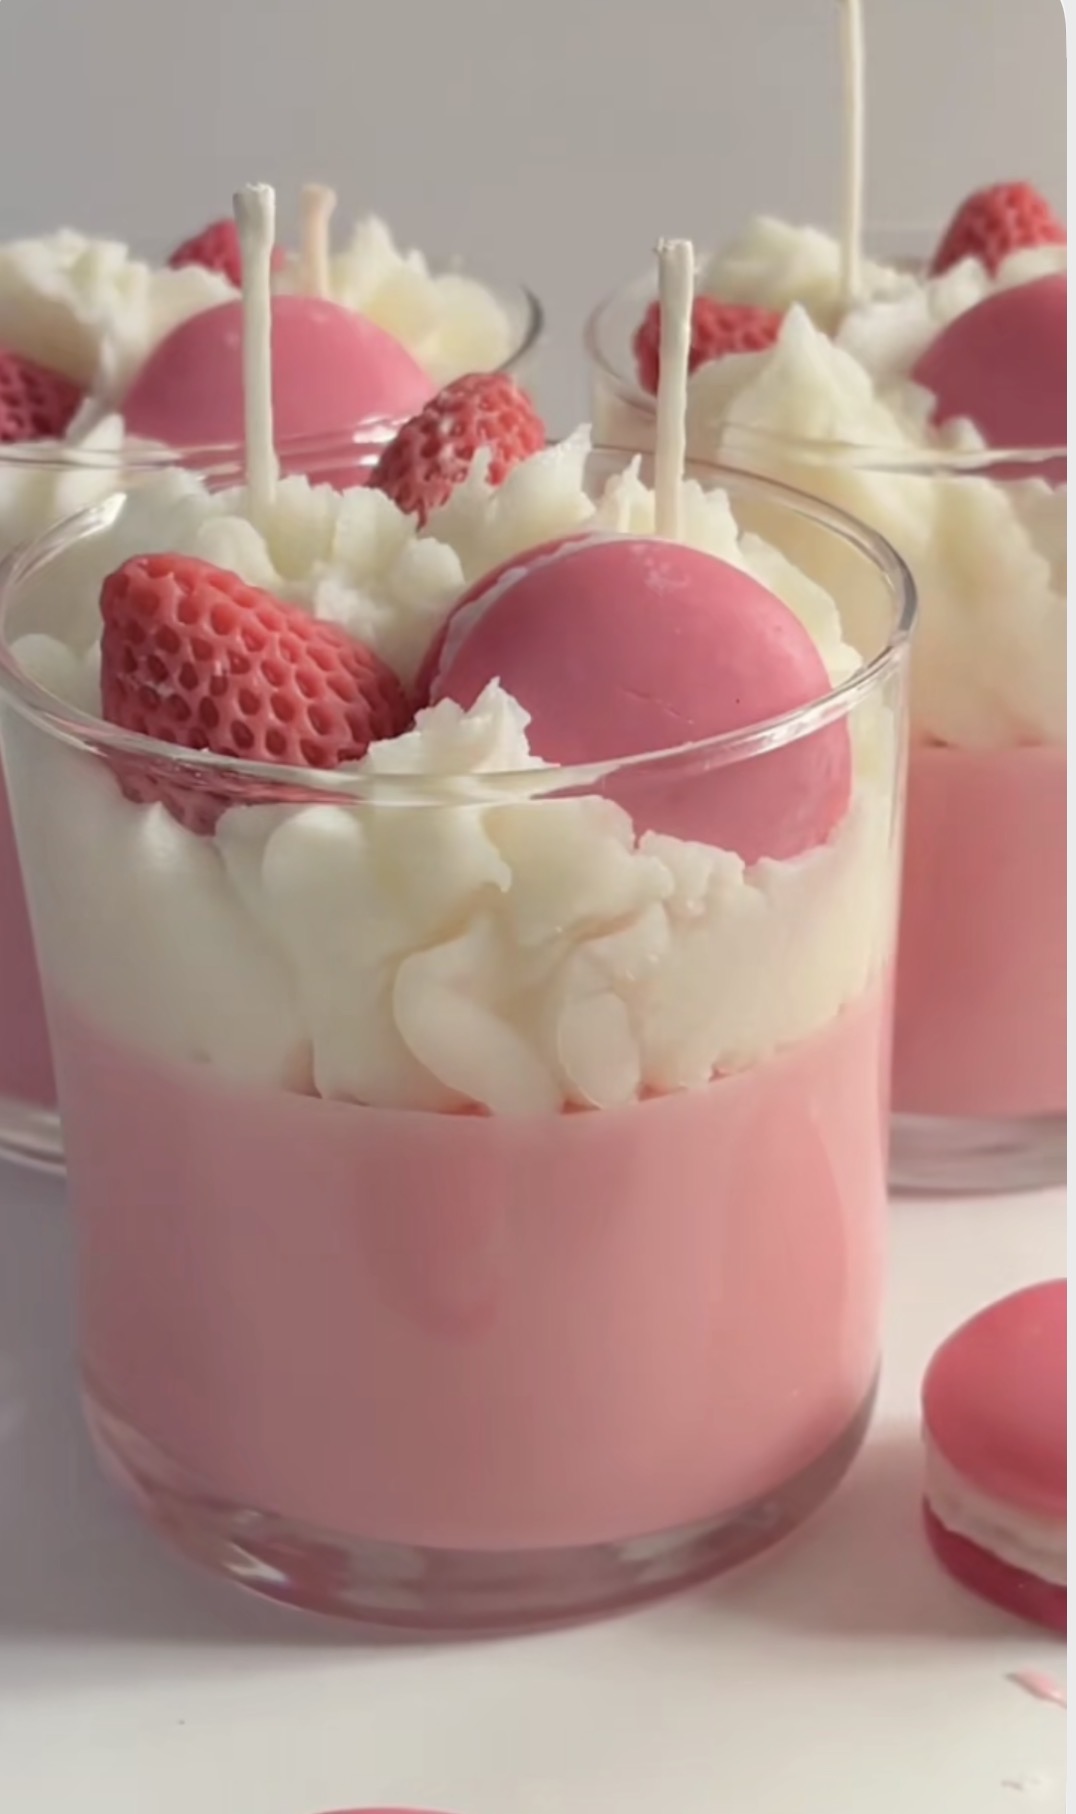
A dessert candle is a decorative candle crafted to resemble a real dessert such as a parfait, cake, or mousse. These candles often include layers, textures, and toppings that mimic food elements. In this case, the strawberry dessert candle features a pink wax base that looks like strawberry cream and a whipped wax topping that resembles fresh cream, often decorated with strawberries or other elements.
These candles are not edible, even though they may look incredibly realistic. They are intended for decoration, gifting, or burning like a regular candle.
Materials and Tools You Will Need
Before starting, it is important to gather all your materials to ensure a smooth process.
Wax
Soy wax is highly recommended because it is easy to work with, burns cleanly, and holds fragrance well. However, you can also use paraffin wax or a soy-paraffin blend depending on your preference.
Dye
You will need a pink candle dye to create the strawberry base. You can use liquid dye or dye chips. The intensity of the color depends on how much dye you add.
Fragrance Oil
A strawberry fragrance oil is optional but highly recommended for a more realistic and enjoyable result. Make sure the fragrance oil is specifically made for candles.
Glass Containers
Choose clear glass jars or cups so the layers and textures are visible. The transparency enhances the dessert-like appearance.
Candle Wicks
Use cotton or wooden wicks suitable for the size of your container. The wick should be long enough to extend above the finished candle.
Thermometer
A thermometer helps you monitor wax temperature, which is crucial for achieving the right consistency.
Double Boiler
This can be a dedicated wax melter or a simple setup using a heat-safe container placed in a pot of hot water.
Piping Bag
A piping bag is used to create the whipped cream effect on top. If you do not have one, you can use a plastic bag with the corner cut off.
Mixing Tools
You will need a spoon or spatula for stirring the wax and blending colors and fragrance.
Decorative Elements
You can use fake strawberries or create your own using wax. Additional decorations such as dried flowers or wax shapes can also be added.
Step 1: Preparing Your Workspace
Start by setting up a clean and organized workspace. Cover your surface with newspaper or a protective mat to avoid wax spills. Make sure all your materials are within reach.
Safety is important, so work in a well-ventilated area and keep hot wax away from children and pets.
Step 2: Melting the Wax
Place your wax into the double boiler and heat it slowly. Stir occasionally to ensure even melting. The ideal melting temperature for soy wax is usually between 70°C and 80°C.
Avoid overheating the wax, as this can affect the final texture and fragrance.
Step 3: Adding Color and Fragrance
Once the wax is fully melted, remove it from heat and allow it to cool slightly to around 60°C.
Add your pink dye gradually until you achieve the desired strawberry color. Stir thoroughly to ensure even distribution.
Next, add the fragrance oil according to the recommended ratio (typically around 6–10% of the wax weight). Stir gently but thoroughly to combine.
Step 4: Preparing the Wick
Place the wick in the center of your glass jar. You can secure it using a wick sticker or a small amount of melted wax at the base.
Use a wick holder or a stick across the top of the jar to keep the wick upright and centered.
Step 5: Pouring the Base Layer
Carefully pour the pink wax into the glass jar. Fill it about halfway or to your desired level.
Allow the wax to cool and partially set. This step is important because you want the base to be firm enough to support the whipped topping, but not completely hardened.
This usually takes around 20 to 40 minutes depending on room temperature.
Step 6: Creating the Whipped Wax
This is the most creative and visually appealing part of the process.
Take a portion of melted wax and allow it to cool while stirring continuously. As the wax cools, it will begin to thicken and take on a creamy, frosting-like consistency.
You are aiming for a texture similar to whipped cream or soft buttercream. This can take several minutes, so patience is key.
Once the wax reaches the right consistency, transfer it into your piping bag.
Step 7: Piping the “Whipped Cream”
Pipe the whipped wax onto the semi-set base layer. Use circular or swirling motions to create a realistic whipped cream effect.
Work quickly but carefully, as the wax will continue to harden.
You can build height and texture by layering the whipped wax.
Step 8: Adding Decorations
While the whipped wax is still soft, place your decorative elements on top.
Position the strawberries carefully to create a balanced and visually appealing design. You can also add small wax shapes, sprinkles, or other details.
Make sure not to place decorations too close to the wick, as this could interfere with burning.
Step 9: Final Setting
Allow the candle to cool and fully harden at room temperature. This may take several hours.
Avoid moving the candle during this time to prevent imperfections.
Once fully set, trim the wick to about 0.5 cm above the surface.
Tips for Perfect Results
- Always monitor temperature to avoid overheating or poor texture.
- Practice the whipped wax technique on a small batch before applying it to your final candle.
- Use high-quality fragrance oils for a stronger scent throw.
- Experiment with different shades of pink for a more realistic strawberry look.
- Keep your design balanced and not overcrowded.
Common Mistakes to Avoid
One common mistake is pouring the whipped wax when it is too hot. This will result in a flat surface instead of a fluffy texture.
Another mistake is not securing the wick properly, which can cause it to shift during pouring.
Overloading the candle with decorations can also affect its appearance and burning performance.
Creative Variations
Once you master the basic strawberry dessert candle, you can experiment with variations:
- Add a white layer under the pink base for a layered dessert look.
- Use different fruit colors to create mixed berry candles.
- Incorporate glitter or shimmer for a more luxurious finish.
- Try different piping tips for varied textures.
How to Use and Display Your Candle
These candles are perfect for home decoration, gifts, or social media content. They can be displayed on shelves, coffee tables, or as part of a decorative arrangement.
If you choose to burn the candle, always do so on a heat-safe surface and never leave it unattended.
Why Dessert Candles Are So Popular
Dessert candles combine visual appeal with creativity. They are satisfying to make and even more satisfying to watch being created, which makes them ideal for video content.
They also offer a unique gifting option that feels personal and handmade.
Conclusion
Making a strawberry dessert candle is a rewarding and enjoyable craft that allows you to express creativity while producing something beautiful and functional. With the right materials, patience, and attention to detail, you can create a candle that looks almost identical to a real dessert.
Whether you are making it for yourself, as a gift, or for content creation, this project is sure to impress. With practice, you can refine your technique and even develop your own signature candle designs.
Take your time, enjoy the process, and most importantly, have fun creating something truly unique.