
Chocolate Cheesecake Brownies
A Rich, Fudgy Dessert with Creamy Swirls
Chocolate cheesecake brownies are the ultimate indulgence for dessert lovers who can’t decide between a dense chocolate brownie and a smooth, tangy cheesecake. This recipe combines the best of both worlds: a deeply chocolatey brownie base topped and swirled with a luscious cream cheese layer, finished with chocolate sauce and whipped cream for a bakery-style presentation.
These brownies are perfect for celebrations, family gatherings, bake sales, or simply when you want to treat yourself to something special. With a fudgy texture, balanced sweetness, and a visually striking marbled top, this dessert is as beautiful as it is delicious.
In this detailed recipe guide, you’ll learn not only how to make chocolate cheesecake brownies step by step, but also why each ingredient matters, how to achieve the perfect texture, and how to customize the recipe to suit your taste.
Table of Contents
- Why You’ll Love Chocolate Cheesecake Brownies
- Ingredients Overview
- Ingredients List
- Equipment Needed
- Preparing the Brownie Base
- Making the Cheesecake Layer
- Assembling the Brownies
- Baking Instructions
- Cooling and Setting
- Decorating with Chocolate Sauce and Whipped Cream
- Texture, Flavor, and Appearance
- Tips for Perfect Cheesecake Brownies
- Common Mistakes to Avoid
- Variations and Flavor Ideas
- Serving Suggestions
- Storage and Shelf Life
- Freezing Instructions
- Frequently Asked Questions
- Final Thoughts
1. Why You’ll Love Chocolate Cheesecake Brownies
Chocolate cheesecake brownies offer a luxurious dessert experience without requiring complicated techniques. They are:
- Rich and chocolate-forward
- Creamy yet dense
- Visually impressive with minimal effort
- Easy to slice and serve
- Perfectly balanced between sweet and tangy
The contrast between the fudgy brownie base and the silky cheesecake layer creates depth in both texture and flavor. Whether served chilled or at room temperature, these brownies never fail to impress.
2. Ingredients Overview
This recipe is built from simple, widely available ingredients. The magic comes from how they work together.
- Brownie Base: Provides structure and intense chocolate flavor
- Cream Cheese Layer: Adds creaminess and slight tang
- Sugar: Sweetens both layers and balances bitterness
- Chocolate Sauce: Enhances chocolate flavor and visual appeal
- Whipped Cream: Adds lightness and a professional finish
Each component plays a role in achieving a dessert that feels rich without being overwhelming.
3. Ingredients List
For the Brownie Base
- 200 g dark chocolate, chopped
- 150 g unsalted butter
- 1 cup granulated sugar
- 2 large eggs, room temperature
- 1 teaspoon vanilla extract
- ¾ cup all-purpose flour
- ¼ cup unsweetened cocoa powder
- ½ teaspoon salt
For the Cheesecake Layer
- 250 g cream cheese, softened
- ½ cup granulated sugar
- 1 large egg
- 1 teaspoon vanilla extract
For Topping and Decoration
- Chocolate sauce (as needed)
- Whipped cream (homemade or store-bought)
4. Equipment Needed
- Mixing bowls
- Hand mixer or whisk
- Rubber spatula
- 9 x 9 inch baking pan
- Parchment paper
- Saucepan or microwave-safe bowl
- Oven
Using parchment paper ensures easy removal and clean slicing.
5. Preparing the Brownie Base
Start by preheating your oven to 170°C (340°F). Line your baking pan with parchment paper, allowing extra paper to hang over the sides for easy lifting later.
Melt the dark chocolate and butter together using a double boiler or microwave. Stir until smooth and glossy. Let the mixture cool slightly so it doesn’t cook the eggs when added.
In a separate bowl, whisk together sugar and eggs until pale and slightly thickened. This step helps create a shiny brownie crust. Add vanilla extract, then slowly pour in the melted chocolate mixture while whisking continuously.
Sift in the flour, cocoa powder, and salt. Fold gently using a spatula until just combined. Avoid overmixing, as this can lead to cakey brownies instead of fudgy ones.
Pour the brownie batter into the prepared pan and spread evenly.
6. Making the Cheesecake Layer
In a clean bowl, beat the softened cream cheese until smooth and lump-free. Add sugar and continue mixing until creamy and well incorporated.
Add the egg and vanilla extract, beating just until combined. Overmixing can introduce too much air, which may cause cracking during baking.
The cheesecake batter should be smooth, thick, and pourable.
7. Assembling the Brownies
Spoon the cheesecake mixture over the brownie base in dollops. Use a knife or skewer to gently swirl the cheesecake into the brownie batter, creating a marbled pattern.
Drizzle chocolate sauce lightly over the top and swirl again for added visual appeal and extra chocolate flavor.
This swirling step not only looks beautiful but also ensures that each bite contains both brownie and cheesecake.
8. Baking Instructions
Place the pan in the preheated oven and bake for 35–45 minutes.
The brownies are done when:
- The edges are set
- The center is slightly soft but not liquid
- A toothpick inserted comes out with a few moist crumbs
Avoid overbaking, as this can dry out both the brownie and cheesecake layers.
9. Cooling and Setting
Once baked, remove the pan from the oven and allow it to cool completely at room temperature. Then refrigerate for at least 2 hours, preferably overnight.
Chilling helps the cheesecake layer set fully and makes slicing cleaner and more precise.
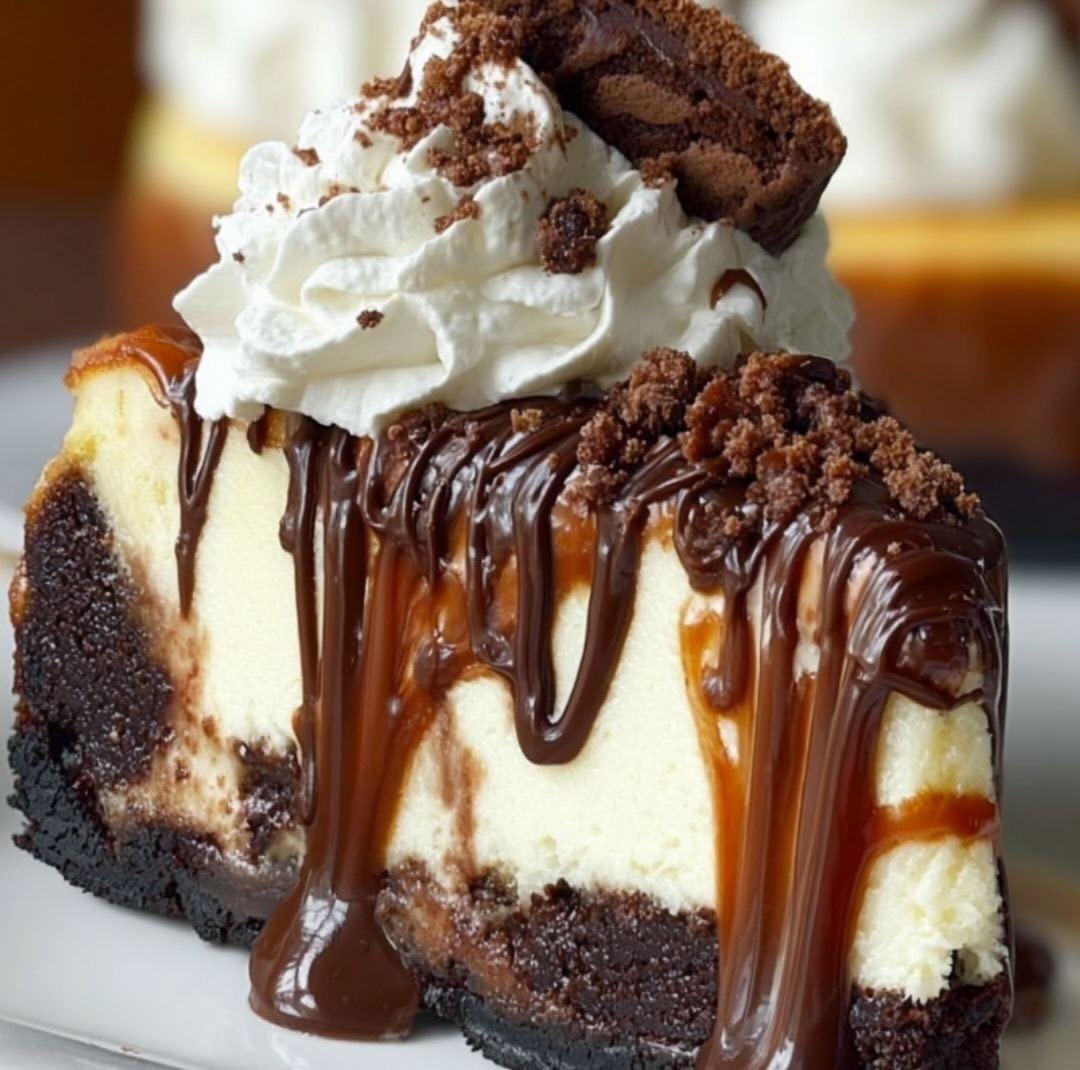
10. Decorating with Chocolate Sauce and Whipped Cream
Before serving, drizzle additional chocolate sauce over the top. Add dollops or piped swirls of whipped cream for an elegant finish.
You can decorate the entire tray or add whipped cream individually to each slice when serving.
11. Texture, Flavor, and Appearance
These chocolate cheesecake brownies are:
- Dense and fudgy at the base
- Creamy and smooth on top
- Rich in chocolate flavor
- Balanced with a subtle tang from cream cheese
The marbled design gives a bakery-quality appearance that makes this dessert perfect for special occasions.
12. Tips for Perfect Cheesecake Brownies
- Always use room-temperature cream cheese
- Do not overmix either batter
- Chill before slicing for clean edges
- Use a sharp knife wiped clean between cuts
Small details make a big difference in the final result.
13. Common Mistakes to Avoid
- Overbaking, which leads to dryness
- Using cold cream cheese, causing lumps
- Skipping the chilling step
- Over-swirling, which blends layers too much
Avoiding these mistakes ensures professional-quality brownies every time.
14. Variations and Flavor Ideas
- Add chopped walnuts or pecans to the brownie base
- Swirl in peanut butter or caramel sauce
- Use milk chocolate for a sweeter profile
- Add espresso powder for deeper chocolate flavor
This recipe is flexible and easy to customize.
15. Serving Suggestions
Serve these brownies:
- As a plated dessert with whipped cream
- With fresh berries on the side
- Slightly chilled or at room temperature
- With coffee or hot chocolate
They work equally well for casual and formal settings.
16. Storage and Shelf Life
Store brownies in an airtight container in the refrigerator for up to 5 days. The flavor often improves after the first day as the layers meld together.
17. Freezing Instructions
Wrap individual slices tightly in plastic wrap, then foil. Freeze for up to 2 months. Thaw overnight in the refrigerator before serving.
18. Frequently Asked Questions
Can I make these ahead of time?
Yes. They are ideal for making a day in advance.
Can I skip the chocolate sauce?
Yes, but it adds extra richness and visual appeal.
Can I double the recipe?
Absolutely. Use a larger pan and adjust baking time accordingly.
19. Final Thoughts
Chocolate cheesecake brownies are a timeless dessert that combines comfort and elegance in one bite. With a fudgy chocolate base, creamy cheesecake swirl, and indulgent toppings, this recipe is guaranteed to become a favorite on your website and in your kitchen.
Whether you’re baking for loved ones or creating content for your audience, this dessert delivers on flavor, texture, and visual appeal every single time.
If you want, I can also:
- Rewrite this for SEO keywords
- Adapt it for a commercial bakery
- Turn it into a printable recipe card
- versions