
Crispy Fried Chicken (Classic Southern Style)
A Golden, Crunchy, Juicy Fried Chicken Recipe Made Perfect at Home
Introduction
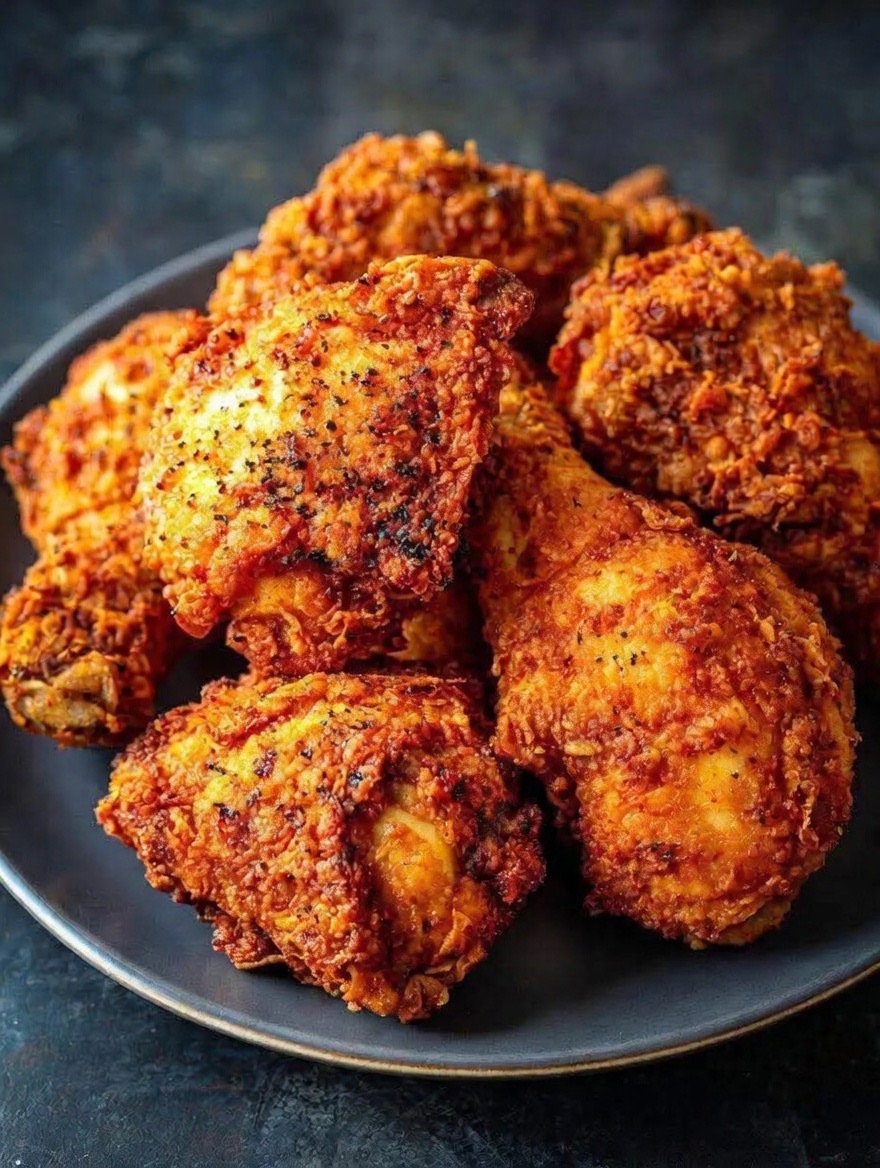
Crispy fried chicken is one of the most iconic comfort foods in the world. Known for its golden, crunchy crust and juicy, tender meat inside, this dish has become a staple in Southern cooking and a favorite across households globally. Whether served at family gatherings, picnics, or casual dinners, fried chicken always delivers satisfaction and flavor in every bite.
This classic Southern-style crispy fried chicken recipe focuses on achieving the perfect balance: a crunchy exterior that stays crisp, and a moist, flavorful interior that is well-seasoned all the way through. The secret lies in layering flavors, using the right flour mixture, and frying at the correct temperature.
In this detailed guide, you will learn not only how to make crispy fried chicken, but also how to properly season, marinate, coat, and fry it to restaurant-quality perfection. You will also find tips, variations, troubleshooting advice, and serving ideas to help you master this timeless dish.
Ingredients
Chicken
- 1 kg chicken pieces (drumsticks, thighs, wings, or a mix)
- Salt and black pepper to taste
- 1 teaspoon paprika
- 1 teaspoon garlic powder
- 1 teaspoon onion powder
Coating Mixture
- 1 cup all-purpose flour
- 1/2 cup cornstarch
- 1 teaspoon baking powder
- 1 teaspoon paprika
- 1/2 teaspoon cayenne pepper (optional for heat)
- Salt and black pepper to taste
Wet Mix (Buttermilk Marinade)
- 1 cup buttermilk
- 1 egg
For Frying
- Vegetable oil or any neutral oil suitable for deep frying
Why This Recipe Works
This fried chicken recipe is built on techniques that ensure maximum crispiness and flavor:
- Buttermilk tenderizes the chicken, making it juicy
- Seasoning is layered into both chicken and flour coating
- Cornstarch creates extra crunch in the crust
- Baking powder helps create a lighter, crispier texture
- Double-layer coating locks in flavor and crunch
- Proper frying temperature ensures even cooking without greasiness
The result is fried chicken that is crispy on the outside, tender on the inside, and packed with flavor in every bite.
Equipment You Will Need
- Large mixing bowls
- Deep frying pan or heavy pot
- Cooking thermometer (highly recommended)
- Tongs or slotted spoon
- Wire rack or paper towels for draining
- Plate or tray for dredging
Step 1: Preparing the Chicken
Start by cleaning and patting the chicken dry using paper towels. Removing excess moisture helps the coating stick better and improves crispiness.
Season the chicken pieces with salt, black pepper, paprika, garlic powder, and onion powder. Massage the seasoning into the meat thoroughly so that every piece is evenly coated.
This step is essential because it builds flavor directly into the chicken, not just the coating.
Step 2: Making the Buttermilk Marinade
In a large bowl, combine buttermilk and egg. Whisk until smooth.
Add the seasoned chicken pieces into the mixture, ensuring they are fully submerged.
Cover and refrigerate for at least 2 hours. For best results, marinate overnight.
Buttermilk is slightly acidic, which helps break down proteins in the chicken, resulting in a more tender and juicy texture after frying.
Step 3: Preparing the Coating Mixture
In a separate bowl, combine:
- Flour
- Cornstarch
- Baking powder
- Paprika
- Cayenne pepper (optional)
- Salt and pepper
Mix thoroughly so that all spices are evenly distributed.
Cornstarch is key here because it reduces gluten formation and creates a lighter, crispier crust. Baking powder helps create small air pockets that make the coating extra crunchy.
Step 4: Coating the Chicken
Remove chicken pieces from the buttermilk mixture, allowing excess liquid to drip off.
Dredge each piece in the flour mixture, pressing firmly so the coating adheres well.
For extra crispiness, you can double coat the chicken:
- Dip again into buttermilk
- Coat again in flour mixture
This creates a thicker, crunchier crust that holds up well during frying.
Place coated chicken on a tray and let it rest for 10–15 minutes before frying. This helps the coating stick better.
Step 5: Heating the Oil
Fill a deep pan or pot with enough oil to fully submerge or partially submerge the chicken pieces.
Heat oil to 170–180°C (340–355°F).
Maintaining correct oil temperature is critical. If the oil is too hot, the chicken will burn on the outside while staying raw inside. If it is too cold, the chicken will absorb excess oil and become greasy.
Step 6: Frying the Chicken
Carefully place chicken pieces into the hot oil using tongs. Do not overcrowd the pan, as this lowers oil temperature and affects crispiness.
Fry in batches if necessary.
Cook chicken for 10–15 minutes per side depending on size, turning occasionally for even browning.
The chicken is done when the crust is golden brown and the internal temperature reaches 75°C (165°F).
Step 7: Draining the Chicken
Remove fried chicken from oil and place it on a wire rack or paper towels to drain excess oil.
Using a wire rack is better because it prevents steam from softening the crust.
Let the chicken rest for a few minutes before serving. This helps the juices settle inside the meat.
Flavor and Texture Profile
This crispy fried chicken delivers:
- Crunchy, golden crust
- Juicy, tender interior
- Balanced seasoning in every bite
- Slight spice and smokiness
- Light, airy coating texture
The combination of buttermilk marinade and seasoned flour creates layers of flavor that make each bite satisfying and rich.
Tips for Success
Use Buttermilk
It tenderizes the chicken and improves flavor absorption.
Maintain Oil Temperature
Use a thermometer for best results.
Let Coated Chicken Rest
This step helps coating stick better during frying.
Do Not Overcrowd the Pan
Frying in batches ensures even cooking.
Use Wire Rack for Draining
Keeps chicken crispy longer.
Variations
Spicy Fried Chicken
Increase cayenne pepper or add hot sauce to the buttermilk.
Extra Crispy Version
Double coat the chicken for a thicker crust.
Oven-Baked Version
Bake at 200°C (400°F) for 35–45 minutes, flipping halfway.
Air Fryer Version
Cook at 180°C (360°F) for 20–25 minutes, spraying lightly with oil.
Serving Suggestions
Crispy fried chicken pairs perfectly with:
- Mashed potatoes and gravy
- Coleslaw
- Biscuits or dinner rolls
- Mac and cheese
- Corn on the cob
It is also great for:
- Family dinners
- Picnics and gatherings
- Party platters
- Sandwiches and wraps
Storage and Reheating
Storage
Store leftovers in an airtight container in the refrigerator for up to 3 days.
Reheating
Reheat in an oven at 180°C (350°F) for 10–15 minutes to restore crispiness.
Avoid microwaving, as it softens the crust.
Common Mistakes to Avoid
Soggy Chicken
Caused by incorrect oil temperature or overcrowding.
Dry Chicken
Overcooking or using very lean cuts.
Coating Falling Off
Usually due to skipping the resting step after coating.
Make-Ahead Tips
You can marinate the chicken overnight and prepare the flour mixture in advance. This makes frying quicker and easier when ready to cook.
Why You Will Love This Recipe
This fried chicken recipe is simple yet delivers restaurant-quality results. It is crispy, juicy, flavorful, and deeply satisfying.
It is also highly customizable, making it perfect for different spice levels and cooking methods.
Conclusion
Classic Southern-style crispy fried chicken is a timeless dish that never goes out of style. With its golden crust, juicy interior, and perfectly balanced seasoning, it is a recipe that brings comfort and joy to any table.
By following this step-by-step guide, you can achieve consistently crispy, flavorful fried chicken at home. Whether you are cooking for family or friends, this dish is guaranteed to impress.
Enjoy the crunch, savor the flavor, and make this crispy fried chicken a staple in your kitchen.