
Crispy Honey Garlic Chicken
A Complete Guide to Making Better-Than-Takeout Chicken at Home
Introduction
There is something undeniably satisfying about crispy, golden fried chicken coated in a sticky, flavorful sauce. It is the kind of dish that feels indulgent, comforting, and irresistible all at once. Crispy Honey Garlic Chicken captures everything people love about takeout-style meals, but with the added benefit of being made fresh in your own kitchen.
This recipe combines tender pieces of chicken with a light, crispy coating, then tosses them in a glossy honey garlic sauce that balances sweetness, saltiness, and a subtle tang. The result is a dish that rivals restaurant-quality food while remaining simple enough for home cooks to prepare.
What makes this recipe particularly appealing is its accessibility. The ingredients are common, the steps are straightforward, and the results are consistently delicious when done correctly. Whether you are cooking for family, hosting guests, or simply treating yourself, this dish is guaranteed to impress.
This comprehensive guide will walk you through every step, from preparing the chicken to achieving the perfect crispy texture and finishing with a rich, flavorful sauce.
Ingredients
For the Chicken
- 1 lb chicken, cut into bite-sized pieces
- Salt and black pepper, to taste
- 1/2 cup all-purpose flour
- 1/2 cup cornstarch
- 1 teaspoon garlic powder
- 2 eggs, beaten
- Oil for frying
For the Sauce
- 1/4 cup honey
- 2 tablespoons soy sauce
- 2 garlic cloves, minced
- 1 tablespoon ketchup
Optional Additions
- 1 teaspoon chili flakes for heat
- 1 teaspoon vinegar for added tang
- Sesame seeds for garnish
- Chopped green onions
Why This Recipe Works
This recipe is successful because it carefully balances texture and flavor:
- The combination of flour and cornstarch creates a crispy coating
- The egg wash helps the coating adhere to the chicken
- Frying at the correct temperature ensures a golden, crunchy exterior
- The honey garlic sauce provides a rich glaze that enhances the chicken without making it soggy
Each component complements the others, resulting in a dish that is both satisfying and well-balanced.
Equipment You Will Need
- Mixing bowls
- Frying pan or deep fryer
- Tongs or slotted spoon
- Paper towels
- Saucepan
- Thermometer (optional but helpful)
Step 1: Preparing the Chicken
Start by cutting the chicken into evenly sized pieces. This ensures that all pieces cook at the same rate.
Season the chicken with salt and black pepper. Let it sit for a few minutes to absorb the seasoning.
Step 2: Preparing the Coating
In a bowl, mix the flour, cornstarch, and garlic powder. This dry mixture will form the crispy outer layer.
In another bowl, beat the eggs.
Dip each piece of chicken into the egg mixture, then coat it in the flour mixture. Make sure each piece is fully covered.
Place the coated chicken on a plate and let it rest for a few minutes. This helps the coating adhere better during frying.
Step 3: Frying the Chicken
Heat oil in a deep pan to about 175°C (350°F). If you do not have a thermometer, test the oil by dropping in a small piece of batter; it should sizzle immediately.
Carefully place the chicken pieces into the hot oil, making sure not to overcrowd the pan.
Fry for 5–7 minutes, or until the chicken is golden brown and cooked through.
Remove the chicken and place it on paper towels to drain excess oil.
For extra crispiness, you can double-fry the chicken by frying it again for 1–2 minutes after the first batch has rested.
Step 4: Preparing the Sauce
In a saucepan over medium heat, combine the honey, soy sauce, minced garlic, and ketchup.
Stir continuously until the sauce begins to simmer and slightly thicken. This should take about 3–5 minutes.
If you prefer a thicker sauce, let it cook a bit longer. For a thinner consistency, add a small amount of water.
Step 5: Combining Chicken and Sauce
Add the fried chicken to the saucepan or pour the sauce over the chicken in a large bowl.
Toss gently until each piece is evenly coated in the sauce.
Work quickly to maintain the crispiness of the chicken.
Step 6: Serving
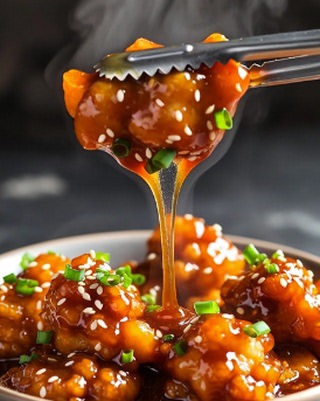
Transfer the chicken to a serving dish and garnish with sesame seeds or chopped green onions if desired.
Serve immediately for the best texture and flavor.
Texture and Flavor Profile
This dish offers a dynamic combination of textures:
- Crispy, crunchy exterior
- Juicy, tender chicken inside
- Sticky, glossy sauce coating
The flavor is a perfect balance of sweet and savory, with a hint of garlic and subtle tang from the sauce.
Tips for Success
Maintain Oil Temperature
Keeping the oil at the right temperature ensures even cooking and prevents greasy chicken.
Do Not Overcrowd the Pan
Frying too many pieces at once lowers the oil temperature and affects crispiness.
Use Cornstarch
Cornstarch is key to achieving a light, crispy coating.
Toss Just Before Serving
Coating the chicken too early can make it lose its crunch.
Variations
Spicy Honey Garlic Chicken
Add chili flakes or hot sauce to the glaze for a spicy kick.
Lemon Honey Chicken
Incorporate lemon juice or zest for a fresh, citrusy flavor.
Baked Version
For a lighter option, bake the coated chicken at high heat until crispy, then toss in the sauce.
Serving Suggestions
This dish pairs well with a variety of sides:
- Steamed rice
- Fried rice
- Noodles
- Stir-fried vegetables
It can also be served as an appetizer or party dish.
Storage and Reheating
Storage
Store leftovers in an airtight container in the refrigerator for up to 3 days.
Reheating
Reheat in an oven or air fryer to restore crispiness. Avoid microwaving if possible.
Nutritional Considerations
While this dish is indulgent, it can be adjusted:
- Use less oil by air frying
- Reduce sugar in the sauce
- Add vegetables for balance
Common Mistakes to Avoid
Soggy Chicken
This can happen if the sauce is added too early or the oil temperature is too low.
Overcooking
Leads to dry chicken.
Underseasoning
Proper seasoning is essential for flavor.
Conclusion
Crispy Honey Garlic Chicken is a perfect example of how simple ingredients can create a dish that feels both indulgent and satisfying. With its crispy coating and flavorful sauce, it delivers everything you expect from takeout, but with the freshness and control of home cooking.
By following this detailed guide, you can achieve consistent, delicious results every time. Whether you are making it for a weeknight dinner or a special occasion, this recipe is sure to become a favorite in your kitchen.
Take your time, enjoy the process, and savor the reward of a homemade dish that truly tastes better than takeout.