
Soft and Fluffy Homemade Bread Rolls That Work Perfectly for Home Baking
Introduction
There is something deeply comforting about freshly baked bread rolls coming out of your own oven. Soft, fluffy, and lightly golden on the outside, homemade bread rolls bring warmth to the kitchen and elevate even the simplest meal. This recipe is designed specifically for home bakers, using straightforward ingredients, clear steps, and reliable techniques that produce consistently excellent results.
These soft bread rolls are ideal for everyday use. They work beautifully as dinner rolls, sandwich buns, or breakfast rolls served with butter and jam. The dough is easy to handle, forgiving for beginners, and flexible enough to adapt to different shapes and uses. Whether you are baking for family meals, holidays, or special gatherings, this recipe delivers bakery-style rolls with a tender crumb and rich flavor.
This long-form guide walks you through every detail of the process, from understanding the role of each ingredient to shaping, baking, and storing the rolls. It is written to be website-ready, informative, and practical, making it perfect for food blogs, recipe collections, or personal cooking websites.
Why This Bread Roll Recipe Works
The success of this recipe comes from balance. The combination of yeast, sugar, warm milk, and fat creates a dough that rises well, bakes evenly, and stays soft for days. Instant yeast simplifies the process by eliminating the need for lengthy proofing steps, while still delivering excellent texture and flavor.
Using milk instead of water enriches the dough, giving the rolls a softer crumb and slightly sweet undertone. Butter or oil adds moisture and tenderness, preventing the rolls from drying out. Proper kneading develops gluten structure, allowing the rolls to rise high and stay fluffy.
This recipe is also highly adaptable. It can be shaped into classic round rolls, slider buns, or elongated sandwich rolls. It freezes well and reheats beautifully, making it ideal for meal planning and batch baking.
Ingredients Overview
All-Purpose Flour
All-purpose flour provides the structure needed for soft yet sturdy rolls. It balances protein content well enough to develop gluten while still producing a tender crumb. Bread flour can be used, but all-purpose flour keeps the texture softer and more delicate.
Instant Yeast
Instant yeast is reliable and easy to use. It blends directly into the dry ingredients and activates quickly when combined with warm liquid. This ensures a strong rise and consistent results.
Sugar
Sugar feeds the yeast and helps the dough rise efficiently. It also contributes to a lightly sweet flavor and helps the rolls brown evenly during baking.
Salt
Salt enhances flavor and strengthens the gluten structure. Without it, the bread would taste flat and lack balance.
Warm Milk
Milk enriches the dough and contributes to softness. It should be warm but not hot, ideally around body temperature, to activate the yeast without killing it.
Butter or Vegetable Oil
Fat is essential for tenderness. Butter adds richness and flavor, while oil produces slightly lighter rolls with a softer crust. Either option works well in this recipe.
Ingredient List
- 4 cups all-purpose flour
- 2¼ teaspoons instant yeast (1 sachet)
- ¼ cup sugar
- 1 teaspoon salt
- 1 cup warm milk
- ¼ cup melted butter or vegetable oil
Equipment Needed
- Large mixing bowl
- Measuring cups and spoons
- Wooden spoon or dough whisk
- Clean work surface
- Baking sheet
- Parchment paper or greased pan
- Clean kitchen towel
Step-by-Step Instructions
Step 1: Combine the Dry Ingredients
In a large mixing bowl, add the flour, instant yeast, sugar, and salt. Whisk or stir thoroughly to ensure the yeast and salt are evenly distributed throughout the flour.
Step 2: Add the Wet Ingredients
Pour the warm milk and melted butter or oil into the dry ingredients. Stir with a spoon or dough whisk until a shaggy dough begins to form.
Step 3: Knead the Dough
Transfer the dough to a lightly floured surface. Knead for 8 to 10 minutes, using the heel of your hand to push the dough away from you, then folding it back over itself. The dough should become smooth, elastic, and slightly tacky but not sticky.
If using a stand mixer, knead with a dough hook on medium speed for about 6 to 7 minutes.
Step 4: First Rise
Place the kneaded dough into a lightly greased bowl, turning once to coat the surface. Cover with a clean kitchen towel and let rise in a warm place for 60 to 90 minutes, or until doubled in size.
Step 5: Shape the Rolls
Punch down the risen dough to release excess air. Divide it into equal portions, typically 12 to 16 pieces depending on desired size. Shape each portion into a smooth ball by tucking the edges underneath.
Place the shaped rolls onto a lined or greased baking sheet, leaving space between each roll.
Step 6: Second Rise
Cover the rolls loosely with a towel and allow them to rise for another 30 to 45 minutes, until puffy and nearly doubled in size.
Step 7: Bake
Preheat the oven to 375°F (190°C). Bake the rolls for 15 to 20 minutes, or until the tops are golden brown and the rolls sound hollow when tapped.
Step 8: Cool and Serve
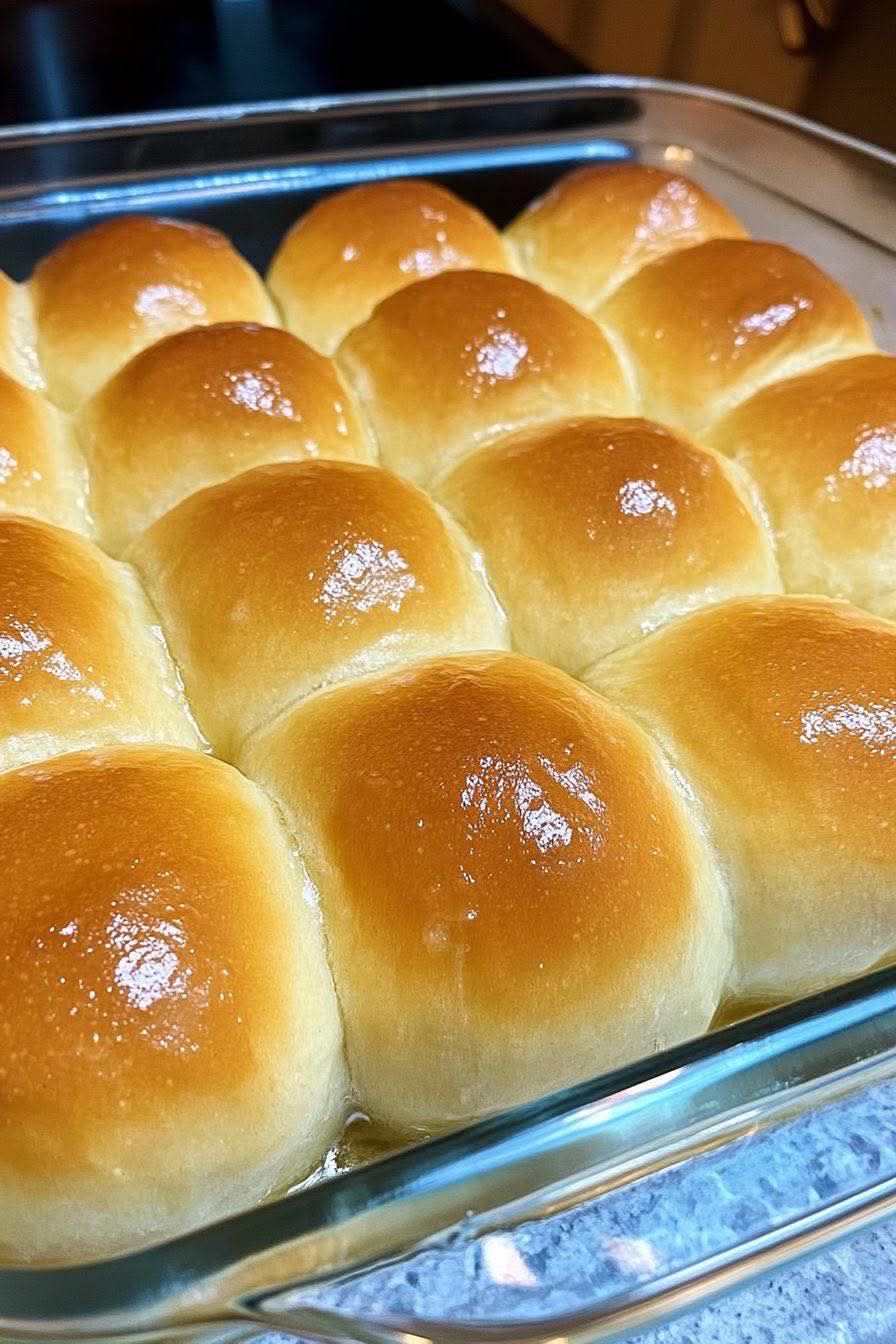
Remove from the oven and brush the tops with melted butter if desired. Allow to cool slightly before serving.
Tips for Extra Soft Rolls
For the softest texture, avoid adding too much flour during kneading. Slightly tacky dough results in lighter rolls.
Brushing the rolls with butter immediately after baking helps keep the crust tender.
Do not overbake. Remove the rolls as soon as they are lightly golden.
Texture and Flavor
These rolls are pillowy soft on the inside with a thin, tender crust. The flavor is lightly sweet, rich, and balanced, making them suitable for both sweet and savory uses.
Serving Suggestions
Serve warm with butter, honey, or jam for breakfast. Use them as dinner rolls alongside soups, stews, or roasted meats. Slice and fill with sandwiches, sliders, or breakfast fillings.
They also work well for holiday meals, potlucks, and family gatherings.
Variations
Add herbs, garlic powder, or grated cheese for savory rolls. For sweeter rolls, increase sugar slightly and add vanilla or cinnamon.
Whole wheat flour can replace up to one cup of the all-purpose flour for a heartier version.
Storage and Freezing
Store baked rolls in an airtight container at room temperature for up to three days. Refrigeration is not recommended, as it can dry them out.
To freeze, allow rolls to cool completely, then store in freezer-safe bags for up to two months. Reheat gently in the oven before serving.
Common Mistakes to Avoid
Using milk that is too hot can kill the yeast. Always use warm, not hot, liquid.
Skipping the second rise results in dense rolls. Allow enough time for proper proofing.
Adding too much flour during kneading can make the rolls heavy and dry.
Frequently Asked Questions
Can I make these rolls ahead of time?
Yes, the dough can be prepared and refrigerated overnight after the first rise.
Can I use active dry yeast instead?
Yes, but it should be dissolved in warm milk with sugar before adding to the flour.
Why are my rolls not fluffy?
This is usually due to under-kneading, insufficient rising time, or old yeast.
Final Thoughts
Soft and fluffy homemade bread rolls are one of the most rewarding baking projects for home cooks. This recipe delivers dependable results, excellent texture, and classic flavor using simple ingredients and clear steps.
Once you master this recipe, it becomes a foundation for countless variations and baking possibilities. Whether served fresh from the oven or reheated the next day, these rolls bring comfort, warmth, and homemade goodness to any table.