
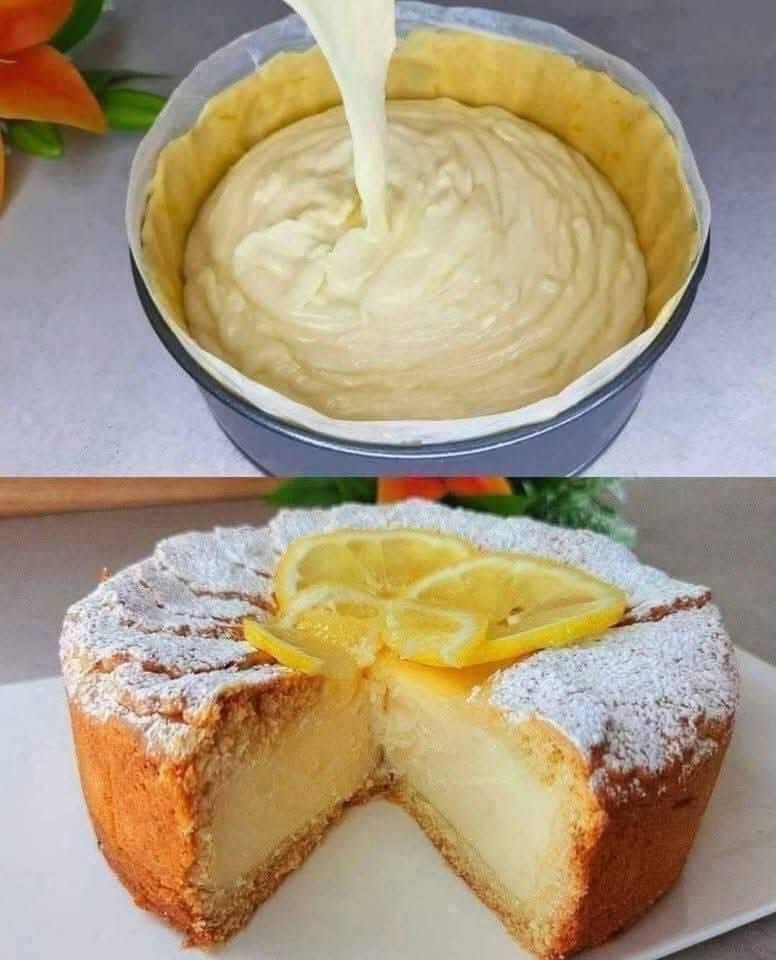
Japanese Cheesecake
A Complete Guide to Baking a Light, Fluffy, Cotton-Soft Cheesecake at Home
Introduction
Japanese cheesecake, often called cotton cheesecake or soufflé cheesecake, is a delicate and airy dessert that has captured the hearts of bakers and dessert lovers around the world. Unlike dense, rich Western-style cheesecakes, this version is known for its light, jiggly texture and subtle sweetness. It sits somewhere between a sponge cake and a traditional cheesecake, offering the best of both worlds.
What makes Japanese cheesecake truly special is its texture. It is soft, fluffy, and almost cloud-like, with a gentle bounce when touched. Each bite melts in your mouth, delivering a delicate balance of creamy richness and light sweetness, enhanced by a hint of citrus from lemon zest.
This guide will take you through everything you need to know to successfully bake a perfect Japanese cheesecake. From understanding the science behind its texture to mastering techniques like whipping egg whites and baking in a water bath, you will gain the confidence to recreate this iconic dessert in your own kitchen.
Ingredients
Main Ingredients
- 8 ounces cream cheese
- 4 tablespoons unsalted butter
- 6 large egg yolks
- 1/3 cup sugar
- 1/2 cup all-purpose flour
- 1 1/2 tablespoons cornstarch
- 1/4 cup heavy cream
- 1 tablespoon lemon zest
Additional Ingredients (Essential for Structure)
- 6 large egg whites
- 1/4 teaspoon cream of tartar or a few drops of lemon juice
Understanding Japanese Cheesecake
Japanese cheesecake differs significantly from traditional cheesecakes in both preparation and texture. Instead of relying solely on dense cream cheese, it incorporates whipped egg whites, which are folded into the batter to create a light, airy structure.
This technique is similar to making a soufflé, where air bubbles trapped in the meringue expand during baking, giving the cake its signature height and softness.
Another defining feature is the use of a water bath, which ensures gentle, even baking and prevents the cake from cracking or drying out.
Equipment You Will Need
- 8-inch round cake pan
- Parchment paper
- Aluminum foil
- Mixing bowls
- Hand mixer or stand mixer
- Whisk
- Spatula
- Baking tray for water bath
Step 1: Preparing the Pan
Line the bottom and sides of your cake pan with parchment paper. Wrap the outside of the pan with aluminum foil to prevent water from seeping in during baking.
Preheat your oven to 160°C (320°F).
Step 2: Melting the Cream Cheese Mixture
In a heatproof bowl set over a pot of simmering water, combine the cream cheese, butter, and heavy cream. Stir gently until the mixture becomes smooth and fully melted.
Remove from heat and allow it to cool slightly.
Step 3: Mixing the Batter Base
Add the egg yolks one at a time to the cream cheese mixture, whisking well after each addition.
Stir in the sugar and lemon zest, mixing until smooth.
Sift in the flour and cornstarch, then mix gently until fully incorporated and free of lumps.
Step 4: Preparing the Meringue
In a clean, dry bowl, beat the egg whites on medium speed until foamy. Add the cream of tartar or lemon juice.
Gradually add sugar while continuing to beat. Increase the speed and whip until soft peaks form. The meringue should be glossy and hold its shape without being too stiff.
Step 5: Folding the Batter
Take a small portion of the meringue and mix it into the batter to lighten it.
Then gently fold the remaining meringue into the batter in batches. Use a spatula and fold carefully to avoid deflating the mixture.
The final batter should be smooth, airy, and slightly thick.
Step 6: Assembling for Baking
Pour the batter into the prepared cake pan. Tap the pan lightly on the counter to release large air bubbles.
Place the pan inside a larger baking tray and fill the tray with hot water to create a water bath.
Step 7: Baking
Bake the cheesecake at 160°C (320°F) for about 60–70 minutes.
After the initial baking time, reduce the temperature to 140°C (285°F) and continue baking for another 20–30 minutes.
The cake should be set but still slightly jiggly in the center.
Step 8: Cooling
Turn off the oven and leave the door slightly open. Allow the cheesecake to cool gradually inside the oven for about 1 hour.
This step helps prevent sudden temperature changes that can cause the cake to collapse.
Once cooled, remove the cake from the pan and let it cool completely at room temperature.
Texture and Flavor Profile
Japanese cheesecake is known for its unique texture:
- Light and airy, almost like a sponge
- Moist and creamy without being dense
- Soft and slightly jiggly
The flavor is mildly sweet with a subtle tang from the cream cheese and a refreshing hint of lemon.
Tips for Success
Use Room Temperature Ingredients
This ensures smooth mixing and better incorporation.
Do Not Overbeat the Meringue
Stiff peaks can make folding difficult and result in a dense cake.
Fold Gently
Preserving air in the batter is key to achieving the signature fluffy texture.
Bake in a Water Bath
This prevents cracks and ensures even cooking.
Cool Gradually
Avoid removing the cake from the oven immediately after baking.
Common Mistakes to Avoid
Collapsed Cake
This can happen due to underbaking or sudden temperature changes.
Dense Texture
Often caused by overmixing or deflating the meringue.
Cracked Surface
Usually the result of high heat or skipping the water bath.
Variations
Chocolate Japanese Cheesecake
Add melted chocolate to the batter for a rich variation.
Matcha Version
Incorporate matcha powder for a unique flavor and color.
Fruit-Flavored
Add fruit purée or zest variations like orange or lime.
Serving Suggestions
Japanese cheesecake is best served slightly chilled or at room temperature.
You can enhance it with:
- A dusting of powdered sugar
- Fresh berries
- Whipped cream
- A light fruit glaze
Storage and Shelf Life
Refrigeration
Store in an airtight container in the refrigerator for up to 3 days.
Freezing
Wrap tightly and freeze for up to 1 month. Thaw in the refrigerator before serving.
Nutritional Overview
Compared to traditional cheesecakes, Japanese cheesecake is lighter in both texture and calories. It uses less sugar and relies on whipped egg whites for volume instead of heavy cream or dense cheese.
Why You Will Love This Recipe
This recipe offers a perfect balance between elegance and simplicity. While it requires attention to detail, the steps are straightforward and rewarding.
The result is a dessert that looks impressive, tastes delicate, and feels light enough to enjoy any time.
Conclusion
Japanese cheesecake is a beautiful example of how technique can transform simple ingredients into something extraordinary. Its soft, airy texture and subtle flavor make it a standout dessert that appeals to a wide range of tastes.
By following this detailed guide, you can confidently create a bakery-quality cheesecake at home. With practice, you will master the techniques and be able to experiment with your own variations.
Take your time, enjoy the process, and appreciate the craftsmanship behind this delicate dessert. The reward is a cheesecake that is not only delicious but also a joy to make and share.