
Key Lime Pie Jars
A Classic Dessert Reimagined in Individual Servings
Key Lime Pie is one of those desserts that feels timeless. Tart yet creamy, refreshing yet indulgent, it has earned its place as a staple of American dessert culture, especially in warmer months. Traditionally baked in a pie dish with a graham cracker crust, Key Lime Pie is beloved for its simplicity and bright citrus flavor.
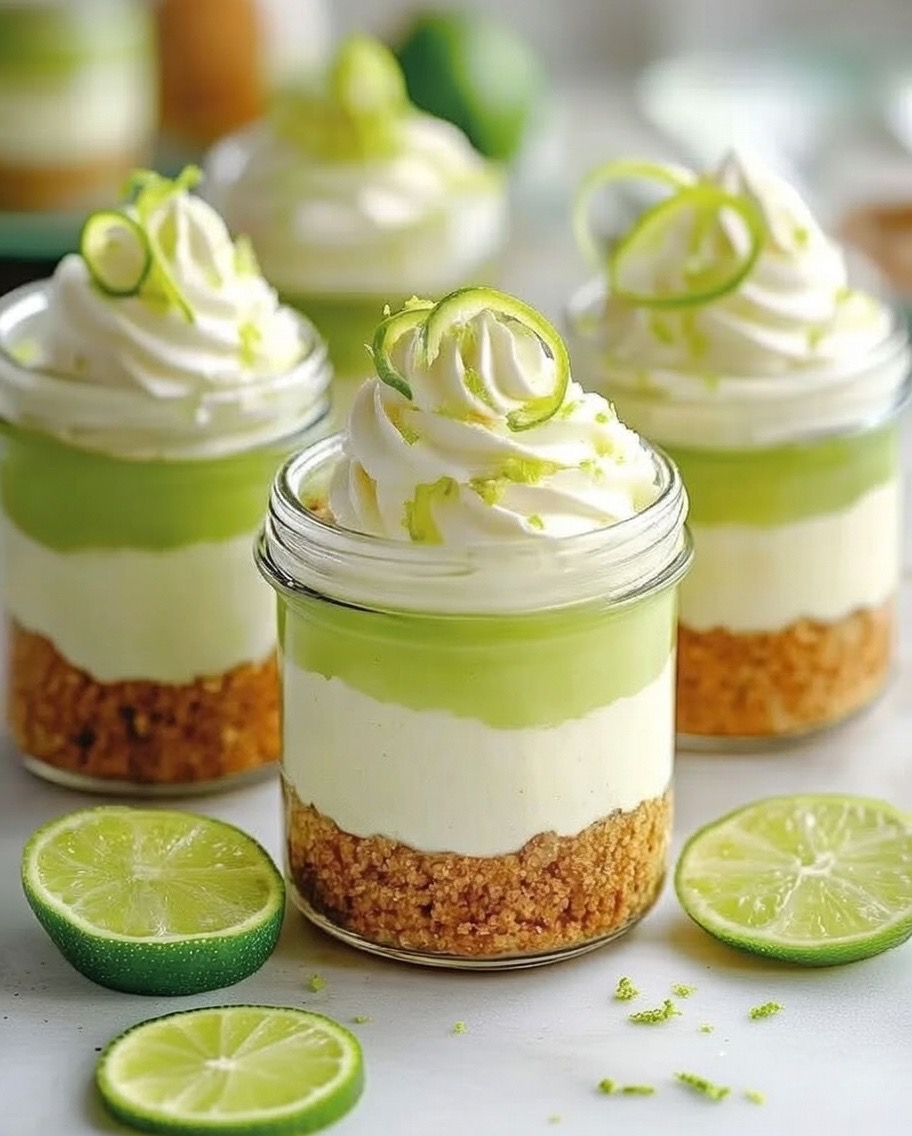
These Key Lime Pie Jars take everything you love about the classic dessert and present it in a modern, convenient, and visually appealing way. Served in individual jars, this version is perfect for entertaining, gifting, make-ahead desserts, or portion-controlled indulgence. There’s no slicing required, no worry about presentation falling apart, and no stress when transporting them to gatherings.
This recipe uses a no-bake filling, making it accessible for home bakers of all skill levels. The result is a silky, tangy, perfectly balanced dessert layered with buttery graham cracker crust, luscious lime filling, and optional toppings that elevate the final presentation.
Whether you are building content for a food website, planning desserts for a party, or simply craving something refreshing, these Key Lime Pie Jars deliver every time.
What Makes Key Lime Pie Special
Before diving into the recipe, it’s worth understanding why Key Lime Pie works so well.
At its core, Key Lime Pie relies on the interaction between acid and dairy. Sweetened condensed milk thickens naturally when combined with acidic lime juice, creating a creamy texture without the need for baking or gelatin. This makes it ideal for jar desserts and chilled presentations.
Traditional Key Lime Pie uses Key limes, which are smaller, more aromatic, and more tart than regular Persian limes. However, because Key limes can be difficult to find, this recipe allows for flexibility while preserving the signature flavor.
Why Make Key Lime Pie in Jars
There are several advantages to preparing this dessert in jars rather than as a traditional pie:
- Individual portions ensure consistent presentation
- Easy to transport without worrying about slicing or cracking
- Perfect for make-ahead preparation
- No baking required
- Ideal for events, holidays, and meal prep
- Visually appealing layered presentation
Jar desserts also allow for customization, letting you add layers, toppings, or flavor variations without affecting the structure of the dessert.
Ingredient Breakdown
Crust
- 1 1/2 cups graham cracker crumbs
- 1/4 cup granulated sugar
- 6 tablespoons unsalted butter, melted
The crust provides a buttery, slightly sweet contrast to the tart filling. Graham crackers are traditional, but variations are discussed later in this article.
Filling
- 1 (14-ounce) can sweetened condensed milk
- 1/2 cup fresh lime juice (Key lime juice preferred)
- 1 tablespoon finely grated lime zest
- 8 ounces cream cheese, softened
- 1 teaspoon vanilla extract
This combination creates a smooth, rich filling with balanced sweetness and acidity. The cream cheese adds structure and a subtle tang, making the jars easy to spoon without being runny.
Optional Toppings
- Fresh whipped cream
- Lime zest or lime slices
- Crushed graham crackers
- White chocolate shavings
Toppings are optional but highly recommended for both flavor and visual appeal.
Equipment Needed
- Mixing bowls
- Electric mixer or whisk
- Rubber spatula
- Measuring cups and spoons
- Microplane or fine grater
- Small jars or dessert cups (6 to 8 jars, depending on size)
Step-by-Step Instructions
Step 1: Prepare the Graham Cracker Crust
In a medium mixing bowl, combine the graham cracker crumbs and granulated sugar. Stir until evenly mixed. Slowly pour in the melted butter, stirring until the crumbs are fully coated and resemble wet sand.
The texture should hold together when pressed between your fingers without feeling greasy.
Spoon approximately 2 to 3 tablespoons of the mixture into the bottom of each jar. Use the back of a spoon or the bottom of a glass to gently press the crust into an even layer.
Place the jars in the refrigerator while you prepare the filling. Chilling helps the butter firm up, creating a sturdy base.
Step 2: Make the Key Lime Filling
In a large mixing bowl, beat the softened cream cheese until smooth and free of lumps. This step is essential for a silky filling, so take your time and scrape down the sides of the bowl as needed.
Add the sweetened condensed milk and continue mixing until fully combined.
Next, add the lime juice, lime zest, and vanilla extract. Mix on low speed at first, then increase slightly until the mixture is smooth and thickened.
As the lime juice reacts with the condensed milk, the filling will naturally firm up. Taste the mixture and adjust if needed, adding more zest for brightness or a small amount of juice for extra tang.
Step 3: Assemble the Jars
Remove the jars from the refrigerator. Spoon or pipe the filling evenly over the chilled crust layers, filling each jar nearly to the top.
Smooth the surface with a spoon or spatula for a clean finish.
If you want distinct layers, you can alternate crust and filling, finishing with a final layer of filling on top.
Step 4: Chill and Set
Cover the jars loosely with lids or plastic wrap and refrigerate for at least 4 hours, preferably overnight.
Chilling allows the filling to fully set and the flavors to develop. The texture will become firm yet creamy, perfect for spooning.
Step 5: Add Toppings and Serve
Just before serving, top each jar with whipped cream, additional lime zest, or crushed graham crackers.
Serve chilled.
Flavor and Texture Notes
These Key Lime Pie Jars strike a careful balance:
- Creamy without being heavy
- Tart but not sour
- Sweet without overpowering the citrus
- Crunchy crust that contrasts the smooth filling
The jars maintain their structure beautifully, making them suitable for events and extended refrigeration.
Make-Ahead and Storage Tips
One of the biggest advantages of this dessert is how well it stores.
- Jars can be prepared up to 3 days in advance
- Store covered in the refrigerator
- Add whipped cream just before serving for best texture
- Do not freeze, as freezing can alter the creamy consistency
If transporting, keep jars chilled in a cooler or insulated bag.
Ingredient Substitutions and Variations
Lime Options
- Bottled Key lime juice can be used if fresh Key limes are unavailable
- Regular Persian limes work well with added zest
- A blend of lime and lemon juice adds complexity
Crust Variations
- Vanilla wafer cookies
- Digestive biscuits
- Coconut cookies
- Ginger snaps for a spiced twist
Dairy-Free Option
- Use dairy-free condensed milk
- Substitute plant-based cream cheese
- Use coconut whipped topping
The flavor will shift slightly but remains delicious.
Creative Variations
Coconut Key Lime Pie Jars
Add shredded coconut to the crust and replace vanilla extract with coconut extract. Top with toasted coconut flakes.
Strawberry Key Lime Jars
Layer fresh strawberry compote or sliced strawberries between crust and filling for a fruity contrast.
Chocolate Lime Jars
Use chocolate graham crackers for the crust and add white chocolate shavings on top.
Common Mistakes to Avoid
- Using cold cream cheese, which leads to lumps
- Skipping the chilling step
- Adding too much lime juice, which can overpower the sweetness
- Not pressing the crust firmly enough
Frequently Asked Questions
Can I bake these jars?
No baking is required. The filling sets naturally through chilling.
Are these authentic Key Lime Pie?
They are a modern, no-bake interpretation that captures the traditional flavor profile.
Can I reduce the sweetness?
You can add more lime juice or zest, but the condensed milk is essential for structure.
How many jars does this recipe make?
Approximately 6 to 8 jars, depending on size.
Serving Suggestions
- Serve as a summer dessert after grilled meals
- Pair with iced tea or coffee
- Offer as part of a dessert table
- Package in jars with ribbons for gifting
Final Thoughts
Key Lime Pie Jars are proof that classic desserts can be reinvented without losing their soul. They offer all the flavor of the original pie with added convenience, elegance, and versatility.
Whether you’re creating content for a food website, planning a party menu, or simply craving something bright and refreshing, this recipe delivers consistent results and broad appeal. The layers are visually striking, the texture is luxurious, and the flavor is unmistakably Key Lime Pie.
Once you try this version, it’s hard to go back to slicing traditional pie.