
Melt In Your Mouth Chicken
Introduction
There are certain recipes that earn a permanent place in a home cook’s rotation. They are the dishes you rely on when you need something comforting, dependable, and guaranteed to impress without requiring complicated techniques or hard-to-find ingredients. Melt In Your Mouth Chicken is exactly that kind of recipe. With just a handful of pantry staples and minimal prep time, you can transform simple boneless, skinless chicken breasts into a creamy, flavorful, oven-baked entrée that truly lives up to its name.
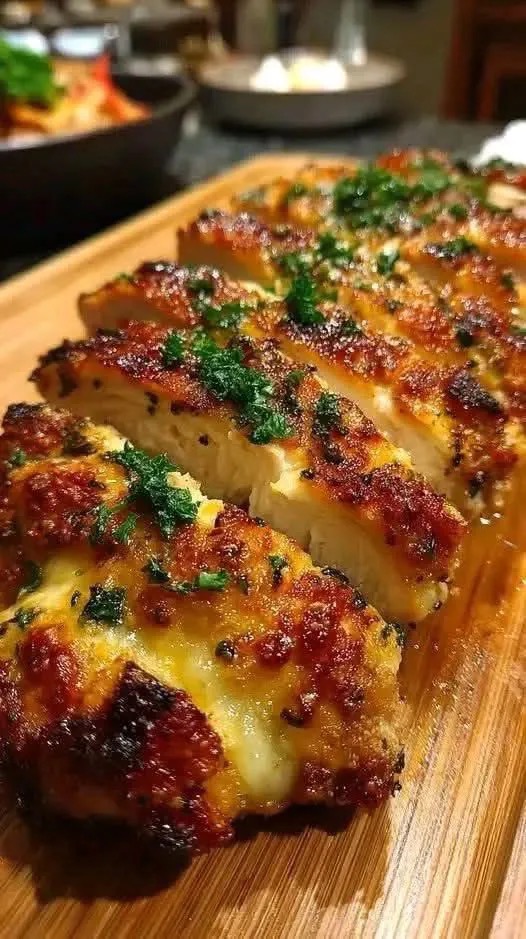
What makes this dish so beloved is the magical combination of tender chicken and a rich, savory topping made from mayonnaise or Greek yogurt, Parmesan cheese, and warm spices. As it bakes, the topping forms a golden, slightly crisp crust on the outside while locking in moisture underneath. The result is chicken so juicy and soft that it practically falls apart with a fork.
Whether you are cooking for a busy weeknight dinner, preparing a comforting family meal, or hosting guests and want something reliable yet impressive, this recipe delivers every time. In this comprehensive guide, you will find everything you need to know to make the best Melt In Your Mouth Chicken, including detailed instructions, helpful tips, variations, serving suggestions, storage advice, and more.
Why You Will Love This Recipe
There are many baked chicken recipes available, but this one stands out for several reasons:
1. Incredible Texture
Chicken breasts are lean and can easily become dry if overcooked. The creamy topping in this recipe acts as a protective layer, sealing in the natural juices of the meat. The result is exceptionally moist, tender chicken with a velvety interior and a golden, slightly crisp exterior.
2. Simple Ingredients
This recipe uses everyday ingredients that most home kitchens already have. There is no need for marinating overnight or preparing elaborate sauces. Everything comes together in minutes.
3. Versatile and Customizable
You can easily adapt the flavors to suit your preferences. Add herbs, adjust the spices, swap mayonnaise for Greek yogurt, or incorporate different cheeses. The base method remains the same, making it endlessly adaptable.
4. Family-Friendly
The creamy Parmesan topping has a mild, comforting flavor that appeals to both children and adults. It is rich without being overwhelming, and the seasoning is balanced and approachable.
Ingredients
Here is what you will need to make Melt In Your Mouth Chicken:
- 4 boneless, skinless chicken breasts
- 1 cup mayonnaise (or plain Greek yogurt for a lighter option)
- 1/2 cup grated Parmesan cheese
- 1 teaspoon garlic powder
- 1/2 teaspoon onion powder
- 1/2 teaspoon paprika
Ingredient Breakdown
Chicken Breasts
Boneless, skinless chicken breasts are ideal for this recipe because they cook evenly and absorb flavor well. Try to choose pieces that are similar in size for even baking. If your chicken breasts are very thick, you may want to pound them slightly to an even thickness.
Mayonnaise or Greek Yogurt
Mayonnaise provides richness and helps create that signature melt-in-your-mouth texture. It also browns beautifully in the oven.
If you prefer a lighter version, plain Greek yogurt works wonderfully. It offers a slight tang and reduces the fat content while still keeping the chicken moist. For best results, use full-fat or 2% Greek yogurt rather than nonfat to maintain creaminess.
Parmesan Cheese
Freshly grated Parmesan cheese adds depth, saltiness, and umami flavor. It also contributes to the golden crust that forms during baking. For the best flavor, grate the cheese yourself rather than using pre-shredded varieties.
Garlic Powder and Onion Powder
These pantry staples provide savory warmth without overpowering the dish. They blend smoothly into the creamy topping and ensure even flavor distribution.
Paprika
Paprika adds subtle smokiness and enhances the color of the topping. You may use sweet paprika for a mild flavor or smoked paprika for a deeper, more robust taste.
Step-by-Step Instructions
Step 1: Preheat the Oven
Preheat your oven to 375°F (190°C). This temperature allows the chicken to cook thoroughly while the topping becomes golden and slightly crisp.
Lightly grease a baking dish large enough to hold all four chicken breasts in a single layer. A glass or ceramic baking dish works particularly well.
Step 2: Prepare the Chicken
Pat the chicken breasts dry with paper towels. Removing excess moisture helps the topping adhere better and encourages proper browning.
If the chicken breasts are uneven in thickness, place them between sheets of plastic wrap and gently pound them with a meat mallet until they are uniform. This ensures even cooking and prevents thinner sections from drying out.
Season both sides of the chicken lightly with salt and black pepper if desired. Although the Parmesan adds saltiness, a light seasoning enhances overall flavor.
Arrange the chicken breasts in the prepared baking dish.
Step 3: Make the Creamy Topping
In a medium mixing bowl, combine:
- 1 cup mayonnaise (or Greek yogurt)
- 1/2 cup grated Parmesan cheese
- 1 teaspoon garlic powder
- 1/2 teaspoon onion powder
- 1/2 teaspoon paprika
Stir until the mixture is smooth and evenly blended. The texture should be thick and spreadable.
Step 4: Spread the Mixture
Using a spoon or spatula, generously spread the mixture over the top of each chicken breast. Make sure the entire surface is covered with an even layer. This coating will protect the chicken and create the signature crust.
Step 5: Bake
Place the baking dish in the preheated oven and bake uncovered for 35 to 45 minutes, depending on the thickness of the chicken breasts.
The chicken is done when the internal temperature reaches 165°F (74°C) as measured with a meat thermometer inserted into the thickest part.
The topping should be lightly golden and slightly bubbly.
Step 6: Rest Before Serving
Remove the chicken from the oven and let it rest for 5 to 10 minutes before serving. This allows the juices to redistribute throughout the meat, resulting in maximum tenderness.
Tips for Perfect Melt In Your Mouth Chicken
Use a Meat Thermometer
Overcooked chicken is dry chicken. A meat thermometer is the most reliable way to ensure perfect doneness.
Avoid Overcrowding
Arrange the chicken in a single layer with space between each piece. Crowding can cause uneven cooking and steaming instead of browning.
Broil for Extra Browning
If you prefer a darker, crispier top, switch the oven to broil for the last 2 to 3 minutes of cooking. Watch closely to prevent burning.
Freshly Grated Cheese Matters
Freshly grated Parmesan melts and browns better than pre-packaged shredded cheese, which often contains anti-caking agents.
Flavor Variations
One of the best aspects of this recipe is its versatility. Here are some delicious ways to customize it:
Herb-Infused Version
Add 1 teaspoon of dried Italian seasoning or a mix of dried thyme and oregano to the topping for a Mediterranean twist.
Spicy Kick
Mix in a pinch of cayenne pepper or a dash of hot sauce for gentle heat.
Lemon Parmesan
Add the zest of one lemon and a tablespoon of fresh lemon juice to the mixture for brightness and freshness.
Cheesy Upgrade
Incorporate a small handful of shredded mozzarella or sharp cheddar for a richer, cheesier crust.
Ranch Style
Replace some of the garlic and onion powder with a tablespoon of dry ranch seasoning for a bold, tangy flavor.
Serving Suggestions
Melt In Your Mouth Chicken pairs beautifully with a wide variety of side dishes.
Classic Comfort Pairings
- Creamy mashed potatoes
- Buttered rice
- Roasted vegetables
- Steamed green beans
Light and Fresh Options
- Garden salad with vinaigrette
- Roasted asparagus
- Sautéed zucchini
- Cauliflower rice
Low-Carb Meal Idea
Serve the chicken alongside roasted broccoli and a simple cucumber salad for a satisfying low-carb dinner.
Make-Ahead and Storage
Make Ahead
You can prepare the chicken with the topping several hours in advance. Cover and refrigerate until ready to bake. This makes it perfect for busy evenings or entertaining.
Storing Leftovers
Store leftover chicken in an airtight container in the refrigerator for up to 3 to 4 days.
Reheating
Reheat gently in the oven at 325°F (165°C) until warmed through. This helps maintain moisture and prevents the topping from becoming rubbery. Microwaving is possible but may slightly alter texture.
Freezing
While you can freeze the cooked chicken, the creamy topping may change texture slightly upon thawing. For best results, freeze in an airtight container for up to 2 months and thaw overnight in the refrigerator before reheating.
Frequently Asked Questions
Can I Use Chicken Thighs?
Yes. Boneless, skinless chicken thighs work well and may even be more forgiving due to their higher fat content. Adjust baking time as needed.
Is Greek Yogurt Really a Good Substitute?
Absolutely. Greek yogurt keeps the chicken moist and adds a pleasant tang. Choose plain yogurt to avoid unwanted flavors.
Can I Add Vegetables to the Baking Dish?
Yes. You can add vegetables like broccoli florets or sliced zucchini around the chicken. Keep in mind that vegetables release moisture, which may slightly affect browning.
Why Is It Called Melt In Your Mouth?
The combination of creamy topping and gentle baking ensures exceptionally tender chicken. The texture is so soft and juicy that it practically dissolves with each bite.
Nutritional Considerations
This dish is naturally high in protein and can be adapted to fit various dietary needs. Using Greek yogurt reduces fat and calories while maintaining creaminess. Pairing the chicken with vegetables instead of starches can create a lighter, balanced meal.
Conclusion
Melt In Your Mouth Chicken is the kind of recipe that proves simple ingredients can produce extraordinary results. With tender, juicy chicken and a savory Parmesan topping that bakes into a golden crust, it delivers comfort and flavor in every bite. The preparation is straightforward, the ingredients are accessible, and the results are consistently impressive.
Whether you choose the classic mayonnaise version or opt for Greek yogurt, this dish is sure to become a reliable favorite in your kitchen. Serve it with your preferred sides, experiment with flavor variations, and enjoy a meal that truly lives up to its name.