
1-Minute Mug Chocolate Cake (Ultra Quick Microwave Dessert)
Introduction
There are moments when you want dessert immediately. Not in 30 minutes, not after baking a full cake, and definitely not after washing a pile of dishes. You want something warm, chocolatey, soft, and comforting in under a minute.
That is exactly what the mug chocolate cake delivers.
This recipe is designed for speed, simplicity, and satisfaction. It turns basic pantry ingredients into a rich, moist chocolate cake cooked directly in a mug using a microwave. No oven, no mixer, no complicated steps. Just mix, microwave, and enjoy.
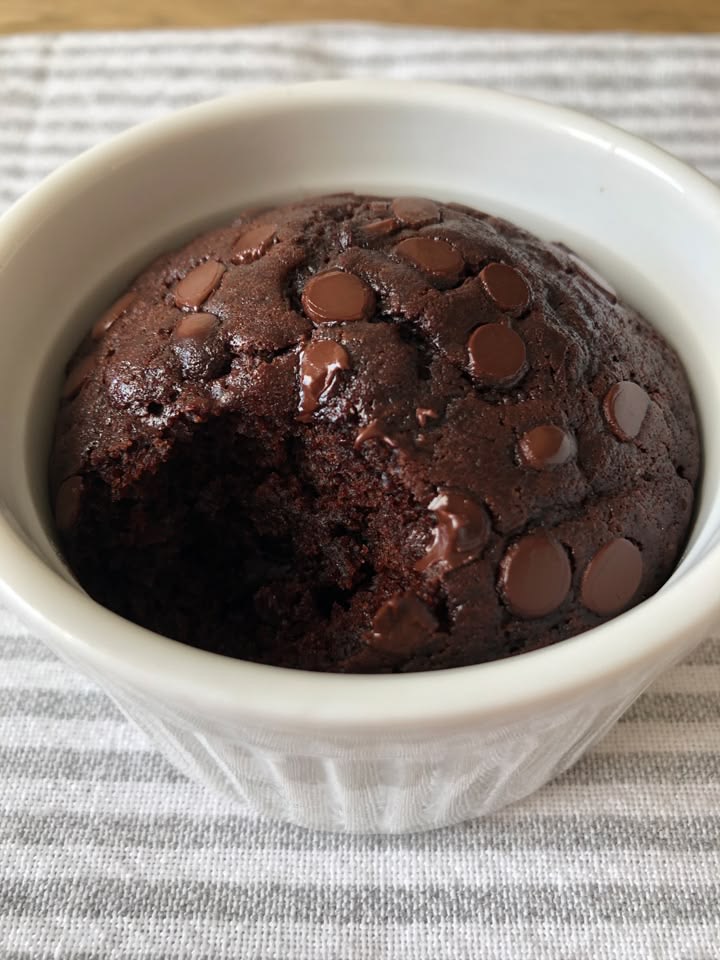
Despite being extremely quick, this cake can be surprisingly soft and fluffy when done correctly. The texture is similar to a single-serving sponge cake with a soft, molten-like center if slightly undercooked.
In this guide, you will learn not only how to make it, but also how it works, how to improve it, how to avoid common mistakes, and how to customize it into different flavors.
Why This Mug Cake Works
This recipe works because it uses simple baking chemistry on a very small scale.
- Flour provides structure
- Cocoa gives deep chocolate flavor
- Sugar adds sweetness and moisture
- Egg binds everything together and helps the cake rise
- Milk softens the batter and prevents dryness
When microwaved, the water molecules in the batter heat up rapidly, creating steam. This steam helps the cake rise quickly, producing a soft and airy texture in just seconds.
Because the portion is small, it cooks evenly and quickly without drying out (if timed correctly).
Ingredients (Detailed Breakdown)
This recipe uses very simple ingredients, but each one plays an important role.
Dry Ingredients
- Flour: About 4–5 tablespoons
This forms the structure of the cake. Too much flour will make it dense and dry. - Cocoa powder: 2 tablespoons
This gives the cake its rich chocolate flavor. Use unsweetened cocoa for best results. - Sugar: 2–3 tablespoons
Adds sweetness and also helps with moisture and softness.
Wet Ingredients
- Egg: 1 medium
Acts as a binder and helps the cake rise and hold shape. - Milk: 3–4 tablespoons
Keeps the batter smooth and ensures a soft texture after microwaving.
Optional Add-ins (Recommended for better taste)
- A small pinch of salt to enhance chocolate flavor
- A few drops of vanilla extract for aroma
- 1 teaspoon oil or melted butter for extra richness
- Chocolate chips for a molten center
Equipment Needed
One of the best things about this recipe is how little equipment it requires.
- 1 microwave-safe mug (at least 300–350 ml capacity)
- 1 spoon or fork for mixing
- Microwave
That’s it. No bowls required if you want to keep things extra simple.
Step-by-Step Instructions
Step 1: Prepare the Mug
Choose a large mug to prevent overflow. Lightly grease it with a small amount of oil or butter if you want easier cleanup, although it is optional.
Step 2: Mix Dry Ingredients
Add the flour, cocoa powder, and sugar into the mug. Stir well with a fork or spoon until everything is evenly combined.
This step is important because it ensures there are no cocoa lumps in the final cake.
Step 3: Add Wet Ingredients
Crack in the egg and pour in the milk. Mix thoroughly until the batter becomes smooth and creamy.
At this stage, you should have a thick but pourable batter. If it feels too dry, add a little more milk. If it feels too runny, add a small pinch of flour.
Step 4: Optional Enhancements
If you want a richer flavor, add:
- A few drops of vanilla extract
- A teaspoon of oil or melted butter
- Chocolate chips in the center or on top
Mix lightly so the chocolate chips remain partially unmelted inside.
Step 5: Microwave Cooking
Place the mug in the microwave and cook on high power for about 60 seconds.
Cooking time may vary depending on your microwave strength:
- 800–1000W: 60–75 seconds
- Lower power: up to 90 seconds
The cake should rise and look set on top but still slightly soft in the center.
Step 6: Rest Before Eating
Let the mug cake rest for 1–2 minutes after microwaving. This helps it finish cooking gently and improves texture.
Then enjoy it directly from the mug.
Texture and Taste Expectations
A perfectly made mug cake should be:
- Soft and fluffy on top
- Moist in the center
- Rich in chocolate flavor
- Slightly dense like a sponge cake
If overcooked, it can become rubbery or dry. That is why timing is very important.
Common Mistakes and How to Avoid Them
1. Overcooking
This is the most common mistake. Even 10–15 extra seconds can change the texture.
Solution: Start with 60 seconds and add more only if needed.
2. Using a Small Mug
The cake rises while cooking. A small mug can cause overflow.
Solution: Always use a large mug.
3. Uneven Mixing
If cocoa or flour is not fully mixed, you may get dry pockets.
Solution: Mix thoroughly before microwaving.
4. Too Much Flour
This makes the cake heavy and dry.
Solution: Measure carefully or use level tablespoons.
Variations of Mug Chocolate Cake
One of the best things about this recipe is how easily it can be customized.
1. Lava Chocolate Mug Cake
Add a cube of chocolate in the center before microwaving. It melts into a gooey center.
2. Double Chocolate Version
Add chocolate chips into the batter for extra richness.
3. Nutty Chocolate Cake
Add chopped walnuts or hazelnuts for crunch and flavor contrast.
4. Peanut Butter Swirl
Add a spoon of peanut butter on top and swirl lightly before microwaving.
5. Coffee Chocolate Cake
Add half a teaspoon of instant coffee to enhance chocolate depth.
Serving Suggestions
Even though this is a single-serve dessert, you can make it feel special:
- Add a scoop of vanilla ice cream on top
- Drizzle with chocolate syrup
- Dust with powdered sugar
- Add whipped cream
- Sprinkle crushed biscuits for texture
Serving it warm enhances the chocolate aroma and makes it more indulgent.
Storage Tips
This cake is best eaten fresh, but if needed:
- It can be stored at room temperature for a few hours
- Refrigeration is not recommended as it may dry out the texture
- Reheat for 10–15 seconds in the microwave before eating
Nutritional Overview (Approximate)
Per serving:
- Calories: Moderate (depends on sugar and chocolate additions)
- Protein: From egg and milk
- Carbohydrates: From flour and sugar
- Fats: Optional if butter or oil is added
This is an indulgent dessert rather than a health food, but it is portion-controlled.
Tips for Perfect Results Every Time
- Always use a large mug
- Do not overfill the batter
- Start with shorter cooking time
- Adjust microwave power if needed
- Let it rest before eating
- Experiment with small flavor changes
Consistency improves after 2–3 tries once you understand your microwave’s power.
Why People Love This Recipe
This mug cake is popular because:
- It takes less than 2 minutes total
- It requires almost no cleanup
- It satisfies chocolate cravings instantly
- It uses basic ingredients found in every kitchen
- It feels like a personal dessert made just for you
It is the perfect example of a quick comfort food.
Frequently Asked Questions
Can I make it without egg?
Yes. You can replace the egg with extra milk and a small amount of oil, but the texture will be slightly denser.
Can I bake it instead of microwaving?
Yes, but it will take longer (around 10–15 minutes at moderate oven heat). The texture will be slightly different.
Why did my cake turn rubbery?
It was likely overcooked. Reduce microwave time next attempt.
Can I double the recipe?
Yes, but use a larger container and increase cooking time carefully. However, results are best when made as single servings.
Can I make it vegan?
Yes. Replace egg with a plant-based substitute and use plant milk.
Final Thoughts
The 1-minute mug chocolate cake is proof that dessert does not need to be complicated. With just a few pantry ingredients and a microwave, you can create a warm, rich, chocolatey treat in moments.
It is simple enough for beginners, fast enough for busy days, and flexible enough for creative variations.
Whether you are craving something sweet late at night, need a quick dessert fix, or just want to experiment in the kitchen, this recipe delivers instant satisfaction.
And the best part?
You don’t even have to share it—unless you want to.