
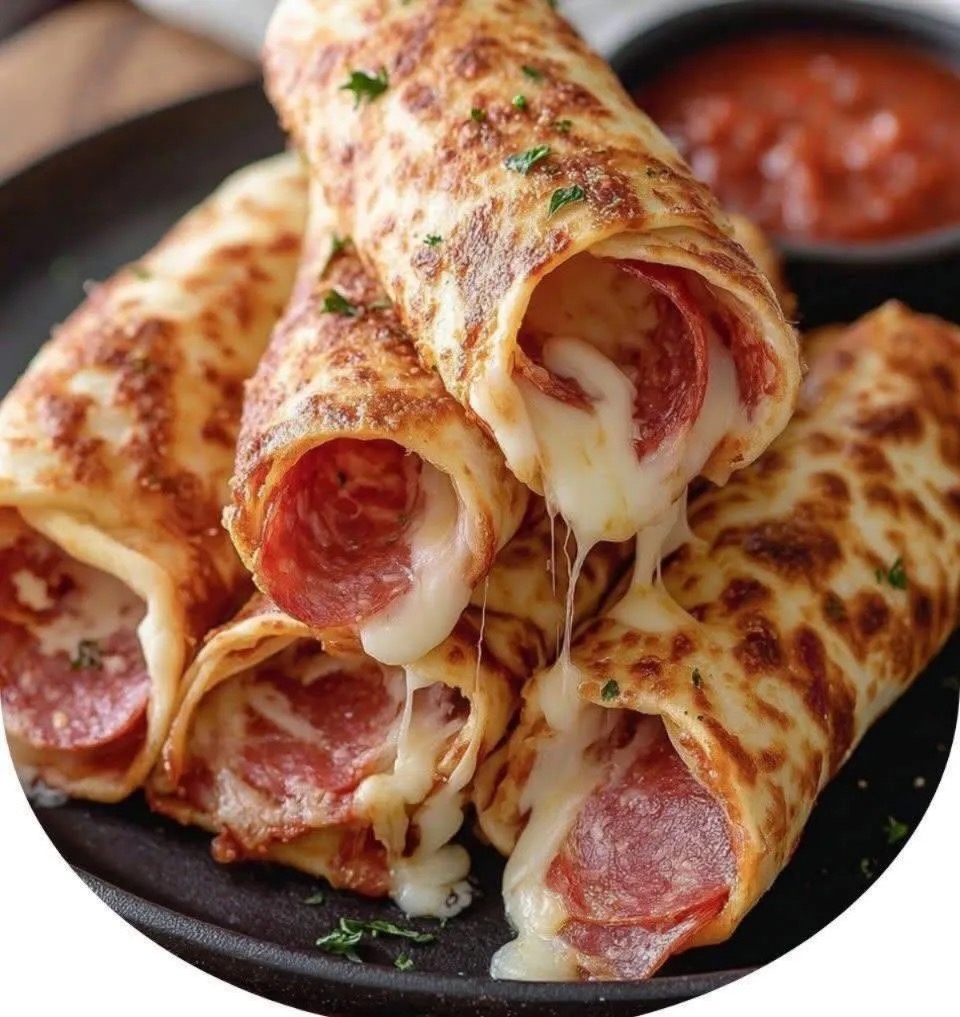
Pepperoni Pizza Rollups (Easy): The Ultimate Homemade Comfort Snack
Pepperoni pizza rollups are one of those irresistibly simple recipes that deliver maximum flavor with minimal effort. Whether you’re hosting a gathering, preparing an after-school snack, or just craving something warm, cheesy, and satisfying, these rollups are a guaranteed crowd-pleaser. They combine all the beloved elements of classic pizza—gooey melted cheese, rich tomato sauce, and savory pepperoni—wrapped in soft, golden dough and baked to perfection.
In this detailed guide, you’ll learn everything you need to know about making perfect pepperoni pizza rollups at home, from selecting the best ingredients to mastering techniques that ensure a delicious result every time. We’ll also explore variations, storage tips, serving ideas, and helpful tricks to elevate this easy recipe into something truly memorable.
Why You’ll Love Pepperoni Pizza Rollups
There are countless reasons why pepperoni pizza rollups have become a staple in many kitchens:
Quick and easy to prepare: With just a handful of ingredients and simple steps, this recipe is perfect for beginners and busy cooks alike.
Versatile: You can customize the fillings to suit your preferences, making it ideal for picky eaters or experimenting with flavors.
Perfect for any occasion: Whether it’s a party appetizer, lunchbox addition, game-day snack, or late-night treat, these rollups fit every scenario.
Kid-friendly: Children love the familiar pizza flavors in a fun, handheld form.
Great for meal prep: You can make them ahead of time and reheat them easily without sacrificing taste or texture.
Ingredients
To make classic pepperoni pizza rollups, you will need the following ingredients:
- 1 package refrigerated pizza dough (or crescent roll dough)
- 1 cup pizza sauce or marinara sauce
- 1 1/2 cups shredded mozzarella cheese
- 20–30 slices of pepperoni (depending on size and preference)
- 1 tablespoon olive oil (optional, for brushing)
- 1/2 teaspoon garlic powder (optional)
- 1/2 teaspoon Italian seasoning (optional)
- 2 tablespoons grated Parmesan cheese (optional, for topping)
Choosing the Right Ingredients
Dough Options
The dough is the foundation of your rollups, so choosing the right type matters.
Refrigerated pizza dough: This option provides a classic pizza texture—slightly chewy on the inside with a crisp exterior.
Crescent roll dough: A softer, flakier alternative that gives a buttery taste and lighter texture.
Homemade dough: If you have extra time, making your own dough can elevate the recipe even further.
Sauce Selection
A good sauce enhances the overall flavor.
- Traditional pizza sauce offers a bold, slightly tangy taste.
- Marinara sauce is smoother and often more herb-forward.
- For variation, you can use garlic butter, pesto, or even barbecue sauce.
Cheese Matters
Mozzarella is the standard choice due to its meltability and mild flavor. However, you can mix in:
- Cheddar for sharpness
- Provolone for depth
- Monterey Jack for extra creaminess
Pepperoni Choices
Classic pork or beef pepperoni works perfectly, but you can experiment with:
- Turkey pepperoni for a lighter option
- Spicy pepperoni for a kick
- Mini pepperoni for easier rolling
Step-by-Step Instructions
Step 1: Preheat the Oven
Preheat your oven to 375°F (190°C). Line a baking sheet with parchment paper or lightly grease it to prevent sticking.
Step 2: Prepare the Dough
Roll out the pizza dough on a clean, lightly floured surface. Shape it into a rectangle approximately 10×14 inches. Try to keep the thickness even to ensure uniform baking.
Step 3: Add the Sauce
Spread a thin, even layer of pizza sauce across the dough, leaving about a half-inch border around the edges. Avoid using too much sauce, as it can make the rollups soggy.
Step 4: Layer the Cheese
Sprinkle shredded mozzarella evenly over the sauce. Make sure the cheese is distributed well so every bite is flavorful.
Step 5: Add the Pepperoni
Arrange the pepperoni slices over the cheese. You can overlap them slightly to ensure full coverage.
Step 6: Roll the Dough
Starting from one long side, carefully roll the dough into a tight log. Keep the roll firm but not overly tight, as the dough needs space to expand while baking.
Step 7: Slice the Rollups
Using a sharp knife, cut the log into 1-inch slices. Place each slice cut-side up on the prepared baking sheet, leaving space between them.
Step 8: Add Toppings (Optional)
Brush the tops lightly with olive oil and sprinkle with garlic powder, Italian seasoning, and Parmesan cheese for extra flavor.
Step 9: Bake
Bake in the preheated oven for 12–15 minutes, or until the rollups are golden brown and the cheese is bubbling.
Step 10: Cool and Serve
Allow the rollups to cool slightly before serving. This helps the cheese set and prevents burns.
Tips for Perfect Pizza Rollups
Don’t overload the filling: Too much sauce or cheese can cause the rollups to fall apart or become soggy.
Roll tightly but gently: A firm roll ensures the layers stay intact without squeezing out the filling.
Use a sharp knife: Clean cuts help maintain the shape of each rollup.
Rotate the pan halfway through baking: This ensures even browning.
Watch the baking time: Overbaking can dry out the dough, while underbaking may leave it doughy in the center.
Creative Variations
Once you’ve mastered the basic recipe, try these variations to keep things interesting:
Vegetarian Rollups
Replace pepperoni with vegetables like bell peppers, mushrooms, olives, and spinach.
Meat Lover’s Version
Add cooked sausage, bacon bits, or ham along with the pepperoni.
Hawaiian Style
Use ham and pineapple chunks for a sweet and savory twist.
Buffalo Chicken Rollups
Substitute pepperoni with shredded buffalo chicken and drizzle with ranch dressing after baking.
Cheesy Garlic Rollups
Skip the pepperoni and focus on cheese, garlic butter, and herbs for a rich, indulgent option.
Serving Suggestions
Pepperoni pizza rollups are delicious on their own, but pairing them with dips and sides makes them even better:
- Extra marinara sauce for dipping
- Ranch or garlic sauce
- Fresh salad for balance
- Soup, such as tomato or minestrone
They are perfect for:
- Game nights
- Birthday parties
- Family movie nights
- Potlucks
- Lunchboxes
Storage and Reheating
Storing Leftovers
Allow the rollups to cool completely before storing them in an airtight container. They can be kept in the refrigerator for up to 3 days.
Freezing Instructions
Place the baked rollups on a tray and freeze until solid, then transfer them to a freezer-safe bag. They can be stored for up to 2 months.
Reheating Tips
- Oven: Reheat at 350°F (175°C) for 8–10 minutes
- Microwave: Heat for 30–45 seconds (may soften texture)
- Air fryer: Reheat at 350°F for 3–5 minutes for a crispy finish
Common Mistakes to Avoid
Using too much sauce: This can make the dough soggy and difficult to roll.
Not sealing the edge: The roll may unravel during baking if not properly sealed.
Skipping parchment paper: This can lead to sticking and uneven browning.
Cutting uneven slices: This causes inconsistent cooking.
Nutritional Overview
While pepperoni pizza rollups are a treat, you can make them lighter by:
- Using whole wheat dough
- Reducing cheese
- Choosing lean meats like turkey pepperoni
- Adding vegetables for extra nutrients
Making It Ahead of Time
One of the best features of this recipe is its flexibility.
You can assemble the rollups ahead of time, cover them tightly, and store them in the refrigerator for up to 24 hours before baking. This is especially useful when preparing for events or busy days.
Why This Recipe Works
The success of pepperoni pizza rollups lies in their balance of flavors and textures:
- The dough becomes golden and slightly crisp on the outside while remaining soft inside.
- The cheese melts into a creamy layer that binds the ingredients together.
- The pepperoni adds a savory, slightly spicy kick.
- The sauce provides moisture and tanginess.
Together, these elements create a satisfying bite every time.
Final Thoughts
Pepperoni pizza rollups are proof that simple ingredients can come together to create something truly delicious. They are easy to make, endlessly customizable, and suitable for almost any occasion. Whether you stick with the classic version or experiment with creative variations, this recipe is one you’ll find yourself returning to again and again.
With a little practice and the tips shared in this guide, you’ll be able to make bakery-quality rollups right in your own kitchen. Serve them fresh from the oven, watch them disappear quickly, and enjoy the satisfaction of a homemade dish that brings people together.