
The Crusty Symphony: No-Knead Rustic Artisan Bread
There is something deeply satisfying about baking bread at home, especially when the result is a crackly, golden loaf with an airy interior and deep, complex flavor. This No-Knead Rustic Artisan Bread is proof that incredible bread does not require hard labor, expensive equipment, or advanced skills. Instead, it relies on time, patience, and a simple understanding of how yeast works.
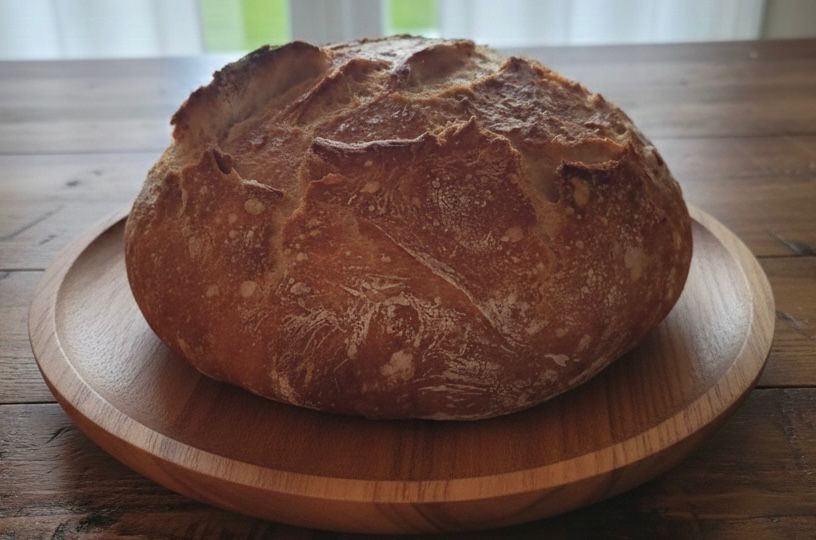
This bread is a celebration of slow fermentation. Rather than kneading the dough to develop gluten, this method allows gluten to form naturally over many hours. The result is a loaf with a crisp, blistered crust and an open, honeycomb crumb that rivals bakery bread. Each slice tells a story of time, transformation, and simplicity.
Whether you are new to bread baking or an experienced home baker, this recipe is approachable, forgiving, and endlessly rewarding. Once you bake this loaf, it is very likely to become a permanent staple in your kitchen.
What Makes No-Knead Bread Special
Traditional bread recipes often emphasize kneading as an essential step. Kneading aligns gluten strands and gives bread structure. However, gluten can also develop through hydration and time. When flour and water are mixed and left undisturbed, enzymes naturally break down starches into sugars while gluten slowly forms on its own.
This no-knead method harnesses that natural process. The long fermentation allows yeast to work slowly, producing complex flavors that are impossible to achieve in quick breads. The dough becomes elastic without effort, resulting in a loaf that is both tender and strong enough to trap air.
Another defining feature of this bread is the baking method. Using a preheated Dutch oven traps steam released from the dough during the first stage of baking. This steam keeps the crust flexible long enough for the bread to rise fully before setting, creating dramatic oven spring and a shatteringly crisp crust.
Flavor, Texture, and Appearance
This bread has a deeply satisfying sensory profile.
The crust is thick, crisp, and deeply golden, with small blisters and cracks that shatter when sliced. The interior crumb is open and irregular, with large air pockets that indicate proper fermentation. The flavor is mild yet complex, slightly nutty, with subtle sweetness from natural fermentation and optional honey or sugar.
It is the kind of bread that requires nothing more than butter and salt, yet it is sturdy enough to support hearty toppings, soups, and sandwiches.
Ingredients Overview and Purpose
Understanding the role of each ingredient helps ensure consistent results.
Flour
Bread flour or all-purpose flour both work well. Bread flour produces a slightly chewier crumb due to its higher protein content, while all-purpose flour yields a slightly softer interior. Either option creates excellent results.
Water
Warm water activates the yeast and hydrates the flour. The water should be warm to the touch but not hot, ideally between 38–43°C (100–110°F).
Yeast
Instant yeast is ideal because it can be mixed directly with dry ingredients and works reliably during long fermentation.
Salt
Salt is essential for flavor and structure. It strengthens gluten and controls yeast activity, preventing over-fermentation.
Honey or Sugar
This ingredient is optional. It adds a touch of sweetness, enhances browning, and gives the crust a deeper golden color.
Ingredients List
- 3 ½ cups flour (bread flour or all-purpose)
- 1 ½ cups warm water
- 1 ½ teaspoons instant yeast
- 1 ½ teaspoons salt
- 1 teaspoon honey or sugar (optional)
Equipment Needed
- Large mixing bowl
- Wooden spoon or spatula
- Plastic wrap or clean towel
- Parchment paper
- Dutch oven or heavy oven-safe pot with lid
- Oven
- Wire cooling rack
Step-by-Step Instructions
Step 1: Mixing the Dough
In a large bowl, whisk together the flour, salt, yeast, and optional honey or sugar. This ensures even distribution before adding water.
Gradually pour in the warm water while stirring with a wooden spoon or spatula. Mix until a shaggy, sticky dough forms. The dough will look rough and uneven, and that is exactly what you want. Do not knead the dough. There is no need to smooth it or work it further.
This loose texture allows water to fully hydrate the flour during fermentation, setting the stage for gluten development.
Step 2: The Long Fermentation
Cover the bowl tightly with plastic wrap or a lid and leave it at room temperature for 8 to 12 hours. Overnight fermentation is ideal.
During this time, the yeast slowly consumes sugars in the flour, producing carbon dioxide and organic acids. The dough will double in size and become dotted with bubbles on the surface.
This slow fermentation is the heart of the recipe. It develops flavor, structure, and texture without effort.
Step 3: Shaping the Dough
Once fermentation is complete, generously dust a work surface with flour. Gently scrape the dough out of the bowl onto the floured surface.
Using lightly floured hands, fold the dough over itself once or twice to form a rough ball. Do not punch it down or handle it aggressively. You want to preserve as many air bubbles as possible.
Place the dough seam-side down onto a sheet of parchment paper. Lightly dust the top with flour, cover loosely, and let it rest for 60 minutes.
This rest allows the dough to relax and slightly rise again before baking.
Step 4: Preheating the Oven and Pot
Place an empty Dutch oven with its lid inside your oven. Preheat the oven to 230°C (450°F) and allow it to heat for at least 30 minutes.
Preheating the pot is essential. The intense heat creates immediate steam when the dough is added, which leads to dramatic oven spring and a crisp crust.
Step 5: Baking the Bread
Carefully remove the hot Dutch oven from the oven. Remove the lid.
Using the parchment paper as handles, lift the dough and lower it gently into the hot pot. Cover with the lid and return it to the oven.
Baking Phase One
Bake covered for 30 minutes. During this time, steam is trapped inside the pot, allowing the bread to rise fully before the crust sets.
Baking Phase Two
Remove the lid and bake for an additional 15 to 20 minutes. The crust will deepen in color, turning a rich golden brown.
The bread is done when it sounds hollow when tapped and the crust is deeply colored.
Step 6: Cooling
Remove the bread from the pot and place it on a wire rack. Allow it to cool completely for at least one hour before slicing.
Cutting too soon releases steam and can result in a gummy texture. Cooling allows the internal structure to set properly.
Common Mistakes to Avoid
- Using hot water, which can kill the yeast
- Skipping the long fermentation
- Cutting the bread before it cools
- Not preheating the Dutch oven
- Overhandling the dough during shaping
Variations and Add-Ins
This base recipe is highly adaptable.
- Add rosemary, thyme, or garlic for a savory loaf
- Fold in olives, cheese, or sun-dried tomatoes after fermentation
- Add whole wheat flour for a heartier texture
- Sprinkle seeds on top before baking
Serving Suggestions
This bread pairs beautifully with soups, stews, and roasted meats. It makes excellent toast, sandwiches, and bruschetta. Serve it warm with butter, olive oil, or soft cheese for a simple pleasure.
Storage and Freezing
Store bread at room temperature in a paper bag or wrapped in a towel for up to two days. Avoid plastic, which softens the crust.
For longer storage, slice and freeze the bread. Toast directly from frozen as needed.
Why This Recipe Is a Classic
This no-knead rustic bread embodies the philosophy that great food does not need to be complicated. It relies on basic ingredients, natural processes, and patience rather than technique. The reward is a loaf that feels artisanal, comforting, and deeply satisfying.
It is a recipe that invites you to slow down, trust the process, and enjoy the simple joy of homemade bread.
Final Thoughts
The Crusty Symphony No-Knead Rustic Artisan Bread is more than a recipe. It is an experience. From the quiet transformation of fermentation to the dramatic reveal of a golden loaf, every step is rewarding.
Once you bake this bread, it becomes clear why it has captured the hearts of home bakers everywhere. It proves that with time, heat, and care, simple ingredients can create something truly extraordinary