
Ultimate Chocolate Lava Cake with Vanilla Custard Center
Introduction
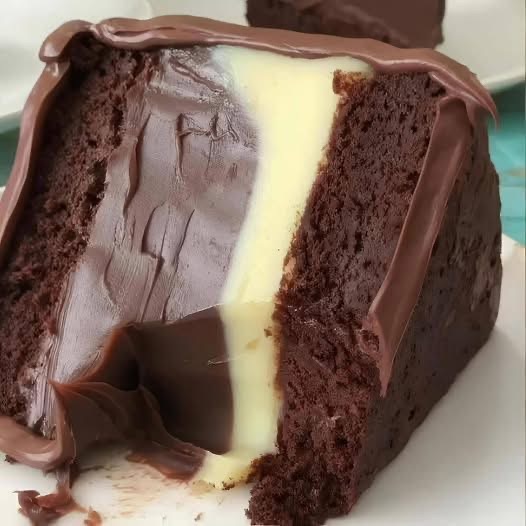
Few desserts capture the imagination and appetite quite like a perfectly baked chocolate lava cake. Crisp and tender on the outside, rich and molten on the inside, it is the kind of dessert that feels luxurious, indulgent, and deeply satisfying. This version takes the classic chocolate lava cake to the next level by introducing a dual center: one half filled with molten dark chocolate and the other with a smooth, creamy vanilla custard. The contrast between the deep cocoa richness and the light, velvety vanilla creates a balanced dessert that is both visually stunning and irresistibly delicious.
This recipe is designed for home bakers who want restaurant-quality results without professional equipment. Every step is explained in detail, from ingredient selection to baking science, ensuring consistent success even if this is your first time making lava cake. Whether you are preparing a romantic dessert, a dinner-party showstopper, or a luxurious weekend treat, this recipe delivers flavor, texture, and presentation.
What Makes This Lava Cake Special
Traditional lava cakes rely on slightly underbaking a chocolate batter to create a molten center. While delicious, that approach can sometimes be inconsistent. This recipe uses pre-prepared fillings that guarantee a flowing center every time.
Key features of this recipe:
- Rich chocolate sponge with a tender crumb
- Two contrasting molten centers: dark chocolate ganache and vanilla custard
- Predictable results with minimal guesswork
- Elegant cross-section presentation when sliced
- Suitable for make-ahead preparation
The result is a cake that looks dramatic, tastes indulgent, and feels refined.
Ingredients Overview
High-quality ingredients are essential for a dessert this simple. Because there are few components, every ingredient plays an important role.
For the Chocolate Cake Batter
- Dark chocolate (60–70% cocoa solids)
- Unsalted butter
- Granulated sugar
- Eggs
- Egg yolks
- All-purpose flour
- Cocoa powder
- Vanilla extract
- Salt
For the Molten Chocolate Center
- Dark chocolate
- Heavy cream
- Unsalted butter
For the Vanilla Custard Center
- Whole milk
- Heavy cream
- Egg yolks
- Granulated sugar
- Cornstarch
- Vanilla bean or vanilla extract
- Butter
For Greasing and Finishing
- Unsalted butter (for molds)
- Cocoa powder (for dusting)
- Optional powdered sugar or cocoa powder for serving
Ingredient Selection Tips
Chocolate
Use real chocolate bars rather than chocolate chips. Chips often contain stabilizers that prevent smooth melting. A dark chocolate with 60–70% cocoa provides depth without excessive bitterness.
Butter
Unsalted butter allows better control of flavor. European-style butter adds richness due to higher fat content, but standard unsalted butter works well.
Eggs
Fresh, room-temperature eggs create better emulsification and structure. Cold eggs can cause the batter to seize when mixed with warm chocolate.
Vanilla
If possible, use vanilla bean or vanilla bean paste for the custard. It adds visible specks and a more complex flavor, though pure vanilla extract is an acceptable substitute.
Equipment Needed
- Ramekins or small oven-safe molds
- Mixing bowls
- Saucepan
- Whisk
- Silicone spatula
- Fine mesh sieve
- Baking tray
- Refrigerator and freezer
Step 1: Preparing the Vanilla Custard Center
The vanilla custard needs time to chill and set, so it should be prepared first.
Instructions
- In a saucepan, combine milk and cream. Heat gently until steaming but not boiling.
- In a bowl, whisk egg yolks, sugar, and cornstarch until smooth and pale.
- Slowly pour the hot milk mixture into the egg mixture while whisking continuously.
- Return the mixture to the saucepan and cook over medium heat, stirring constantly, until thickened.
- Remove from heat and stir in butter and vanilla.
- Transfer to a shallow dish, cover with plastic wrap touching the surface, and refrigerate until fully chilled.
Once chilled, spoon the custard into small molds or dollops and freeze until firm. This ensures the custard remains molten but contained during baking.
Step 2: Preparing the Molten Chocolate Center
The chocolate center is a simple ganache that melts beautifully when baked.
Instructions
- Heat heavy cream until just beginning to steam.
- Pour over chopped dark chocolate and butter.
- Let sit for one minute, then stir until smooth.
- Allow to cool slightly, then spoon into small molds or dollops.
- Freeze until firm.
Freezing both centers is critical to maintaining a defined, flowing interior.
Step 3: Preparing the Cake Batter
Instructions
- Melt dark chocolate and butter together using a double boiler or microwave in short intervals. Stir until smooth.
- Add sugar and whisk until fully incorporated.
- Add eggs and egg yolks one at a time, whisking thoroughly after each addition.
- Stir in vanilla extract and salt.
- Sift flour and cocoa powder together, then gently fold into the batter until just combined.
Avoid overmixing, as it can create a dense cake.
Step 4: Preparing the Molds
Proper mold preparation ensures clean release.
- Generously butter each ramekin, including sides.
- Dust with cocoa powder, tapping out excess.
- Place molds on a baking tray for easy handling.
Step 5: Assembling the Lava Cakes
- Fill each mold halfway with chocolate batter.
- Insert one frozen chocolate center and one frozen vanilla custard center side by side.
- Cover with remaining batter until just below the rim.
- Smooth the tops gently.
At this stage, the cakes can be baked immediately or refrigerated for up to 24 hours.
Step 6: Baking
Oven Temperature
Preheat oven to 200°C (390°F).
Baking Time
Bake for 10–12 minutes. The edges should be set while the center remains soft.
Signs of doneness:
- Tops look matte, not wet
- Edges slightly pull away from the mold
- Centers feel soft when gently pressed
Step 7: Unmolding and Serving
- Let cakes rest for 1 minute.
- Run a knife around the edge.
- Invert onto serving plates.
Serve immediately for the best molten effect.
Serving Suggestions
- Light dusting of powdered sugar
- Cocoa powder or chocolate shavings
- Fresh berries
- Vanilla ice cream
- Lightly whipped cream
The contrast of hot cake and cold accompaniments enhances the experience.
Storage and Make-Ahead Tips
- Unbaked assembled cakes can be refrigerated for up to 24 hours
- Frozen assembled cakes can be baked directly with 1–2 extra minutes
- Baked cakes are best eaten immediately
Common Mistakes and How to Avoid Them
Overbaking
Even one extra minute can cause the center to set. Always err on the side of underbaking.
Skipping Frozen Centers
Room-temperature fillings will blend into the cake rather than remaining molten.
Improper Greasing
Insufficient greasing leads to sticking and broken cakes.
Variations and Flavor Ideas
- Replace vanilla custard with caramel or peanut butter filling
- Add espresso powder to the batter for mocha flavor
- Use milk chocolate for a sweeter profile
- Add orange zest or cinnamon for warmth
Frequently Asked Questions
Can I make this without ramekins?
Yes, use muffin tins, but adjust baking time carefully.
Can I make it gluten-free?
Yes, substitute all-purpose flour with a 1:1 gluten-free blend.
Why didn’t my cake flow?
Most likely overbaking or centers not fully frozen.
Final Thoughts
This chocolate lava cake with vanilla custard center is more than a dessert; it is an experience. From the first crack of the cake to the slow release of molten chocolate and creamy custard, it delivers both drama and comfort. By following this detailed method and understanding the role of each component, you can confidently recreate a bakery-quality dessert in your own kitchen.
Perfect for special occasions or moments when only chocolate will do, this recipe is designed to impress, satisfy, and inspire repeat baking.