
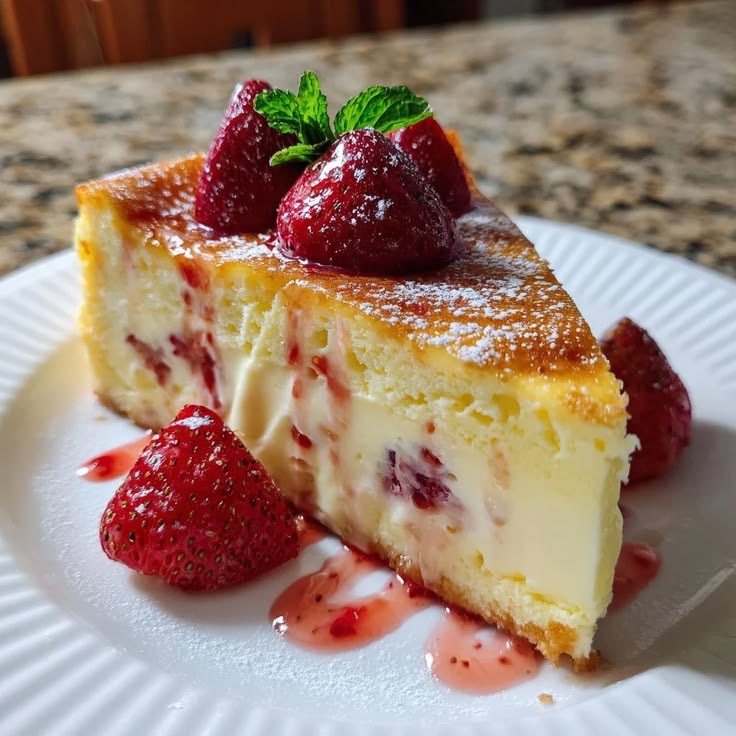
Strawberry Cheesecake with Sponge Cake Crust
This Strawberry Cheesecake with Sponge Cake Crust is the dessert you make when you want to impress. It combines three elements that work perfectly together: a light, airy sponge cake base, an ultra creamy cheesecake filling with ribbons of strawberry sauce, and a fresh berry topping that makes every slice look like it came from a bakery. Unlike a traditional graham cracker crust, the sponge base keeps the whole dessert lighter and gives you that classic European cake feel. The texture lands somewhere between New York cheesecake and Italian ricotta cake. Rich but not heavy, tangy but sweet, and full of real strawberry flavor.
This recipe is written for home bakers. You do not need professional tools or pastry school experience. If you can use a hand mixer and follow a water bath, you can make this. The full write up includes ingredient notes, step by step instructions, troubleshooting, variations, make ahead tips, and answers to the most common cheesecake questions. Plan for about 25 minutes of active prep, 55 minutes of baking, and at least 4 hours of chilling. Overnight is even better.
Why You Will Love This Recipe
The sponge base changes everything. Graham cracker crusts are great, but they can get soggy under a wet cheesecake batter and they add a dense, crumbly texture. A thin genoise style sponge bakes right in the pan and stays light. It soaks up a little moisture from the filling which keeps it tender, not dry. The contrast between the airy cake, the silky cheesecake, and the bright strawberries is what makes this stand out.
Using strawberry sauce swirled into the batter means you get fruit flavor in every bite, not just on top. The fresh strawberries and glaze finish it off so it looks stunning with minimal effort. This is a showstopper for birthdays, Mother’s Day, Valentine’s Day, or any spring and summer gathering.
Ingredient Notes and Substitutions
Understanding your ingredients helps you get consistent results. Here is what each one does and how you can adapt.
For the Sponge Base
Eggs: Use large eggs at room temperature. Cold eggs do not whip to full volume. Room temp eggs trap more air, which is what makes the sponge rise without chemical leaveners.
Granulated Sugar: Regular white sugar works best. It dissolves easily and helps stabilize the whipped eggs.
All Purpose Flour: Spoon and level your flour so you do not pack in too much. Too much flour makes the sponge tough. Cake flour can be used for an even lighter crumb. Use the same amount by volume.
Vanilla Extract: Pure vanilla gives the best flavor. You can swap in almond extract for a different profile. Use ½ teaspoon if you do.
Salt: A small pinch sharpens the flavor and balances sweetness.
For the Cheesecake Filling
Cream Cheese: Use full fat blocks of cream cheese, 24 ounces total. This is three 8 ounce packages. Do not use whipped or spreadable cream cheese from a tub. Those have air and stabilizers that change the texture. Let it soften on the counter for at least 1 hour. Cold cream cheese will leave lumps.
Granulated Sugar: This sweetens and helps create a smooth texture. Do not reduce it by more than 2 tablespoons or the structure can suffer.
Eggs: Three large eggs provide structure. Room temperature is important. Cold eggs can cause the batter to curdle or bake unevenly.
Sour Cream: Full fat sour cream adds tang and creaminess. It also keeps the texture from being too dense. Greek yogurt is a good substitute. Use the same amount.
Vanilla Extract: Use 2 teaspoons for a pronounced vanilla background that supports the strawberry.
Strawberry Sauce: You can use store bought strawberry topping, seedless jam warmed until pourable, or homemade sauce. For homemade, simmer 2 cups chopped strawberries with ⅓ cup sugar and 1 tablespoon lemon juice for 10 minutes, then cool. Strain if you want it seedless. You need ½ cup total for swirling.
For the Topping
Fresh Strawberries: Choose small to medium berries. They look better on the cake and have more flavor. Hull and halve them. If they are very large, quarter them.
Strawberry Glaze: Warm strawberry jam with 1 teaspoon water until loose, or use a store bought glaze. This gives the berries shine and keeps them from drying out.
Powdered Sugar: For dusting. Sift it right before serving so it does not melt.
Fresh Mint Leaves: Optional, but they add color and a fresh aroma.
Equipment You Need
9 inch springform pan. A 9 inch pan gives you a classic height. An 8 inch pan works but the layers will be thicker and may need 5 to 8 extra minutes of bake time.
Parchment paper
Electric hand mixer or stand mixer with paddle attachment
Large roasting pan for the water bath
Heavy duty aluminum foil if your springform pan is not leak proof
Rubber spatula
Fine mesh sieve for dusting powdered sugar
Offset spatula for smoothing batter
Step by Step Instructions
Step 1: Prepare Your Pan and Oven
Preheat your oven to 325°F. Take your 9 inch springform pan and wrap the outside with two layers of heavy duty foil. You want to cover the bottom and at least 2 inches up the sides. This prevents water from seeping in during the water bath. Cut a circle of parchment to fit the bottom of the pan. Lightly grease the sides with butter or baking spray. The parchment helps the sponge release cleanly.
Step 2: Make the Sponge Base
In a large bowl, combine 3 room temperature eggs and ½ cup granulated sugar. Beat on high speed for 5 to 7 minutes. The mixture should triple in volume, turn very pale, and fall from the beaters in thick ribbons that sit on the surface for a few seconds. This stage is called the ribbon stage and it is critical for structure.
Sift ½ cup all purpose flour and the pinch of salt over the egg mixture. Add 1 teaspoon vanilla. Use a large rubber spatula to fold gently. Cut down through the center, scoop along the bottom, and turn the batter over. Rotate the bowl and repeat. Stop as soon as no streaks of flour remain. Overfolding deflates the batter and gives you a flat, tough sponge.
Pour the batter into the prepared pan and smooth the top. Bake for 12 to 15 minutes. The sponge is done when it is lightly golden, springs back when touched, and a toothpick comes out clean. Do not open the oven early or it can collapse. Cool the sponge in the pan on a wire rack. Leave the oven on at 325°F for the cheesecake.
Step 3: Make the Cheesecake Filling
In a large bowl, beat the softened 24 ounces of cream cheese with a hand mixer on medium speed for 2 minutes. Scrape the bowl. Add ¾ cup granulated sugar and beat another 2 minutes until completely smooth and no lumps remain. Scrape the sides and bottom again. Lumps now will not bake out later.
Add the 3 eggs one at a time. Beat on low speed for 20 seconds after each addition. Mixing on low prevents too much air from getting in. Too much air causes cracks and a soufflé like rise and fall.
Add 1 cup sour cream and 2 teaspoons vanilla extract. Mix on low just until combined and smooth, about 30 seconds. Scrape the bowl one final time. The batter should be thick, creamy, and pourable but not runny.
Step 4: Assemble and Swirl
Make sure the sponge base is no longer hot to the touch. Warm is fine. Pour half of the cheesecake batter over the sponge and spread it level with an offset spatula.
Drop half of your ½ cup strawberry sauce by teaspoonfuls over the batter. Use a thin knife or a skewer to swirl. Do not over swirl or you will muddy the colors. Three or four figure eight motions are enough.
Pour the remaining cheesecake batter on top and smooth it. Drop the rest of the strawberry sauce on the surface and swirl again. The top does not have to be perfect. It will settle as it bakes.
Step 5: Bake in a Water Bath
A water bath, or bain marie, is the best way to get a creamy texture and prevent cracks. Place the foil wrapped springform pan into a large roasting pan. Pour hot water from a kettle into the roasting pan until it comes 1 inch up the sides of the springform pan. Hot water is important. Cold water will lower the oven temperature and increase bake time.
Carefully transfer the roasting pan to the oven. Bake at 325°F for 45 to 50 minutes. The cheesecake is done when the edges are set and look slightly puffed, and the center 2 to 3 inches still has a slight jiggle when you gently nudge the pan. An instant read thermometer in the center should read 150°F. The center will continue to set as it cools.
Turn off the oven. Crack the oven door open about 1 inch and let the cheesecake cool in the water bath for 1 hour. This slow cooling prevents the dramatic temperature change that causes cracks.
Step 6: Chill Thoroughly
Remove the cheesecake from the water bath and take off the foil. Run a thin knife around the edge to loosen it from the pan. This prevents the cake from tearing as it contracts in the fridge. Cool on a wire rack until it reaches room temperature, about 1 more hour.
Cover the pan with plastic wrap and refrigerate at least 4 hours. Overnight is best. Chilling fully is not optional. The texture and flavor develop during this time. Cutting too early gives you a soft, messy slice.
Step 7: Decorate and Serve
When ready to serve, release the springform latch and remove the sides. Slide the cheesecake onto a serving plate if you want, or serve from the base. Arrange halved fresh strawberries on top. Warm ¼ cup strawberry jam with 1 teaspoon water for 10 seconds in the microwave and brush it over the berries for shine. Dust the whole thing lightly with powdered sugar right before bringing it to the table. Add a few mint leaves for color.
To slice, use a large sharp knife. Dip it in hot water and wipe it clean between each cut. This gives you clean, professional looking slices.
Expert Tips for a Perfect Cheesecake
Room Temperature Ingredients: This is the most important rule. Cold cream cheese will not blend smooth. Cold eggs can make the batter curdle. Set everything out 1 hour before you start.
Do Not Overmix: Once the eggs are in, mix on low and stop when combined. Overbeating adds air, and air expands in the oven. When the cheesecake cools, that air collapses and leaves cracks or a sunken center.
The Water Bath Matters: It insulates the custard and lets it bake gently and evenly. If you are worried about leaks, place the springform pan inside a 10 inch cake pan, then set that in the water. No foil needed.
No Peeking: Opening the oven door during the first 40 minutes can cause the center to fall. Use the oven light to check.
The Jiggle Test: A fully set cheesecake will be dry and crumbly. You want a slight wobble in the very center. It should look like Jell-O, not like liquid.
Cool Gradually: The hour in the turned off oven is not wasted time. It is what keeps the top smooth.
Troubleshooting Common Problems
Why did my cheesecake crack? Usually from overmixing, overbaking, or cooling too fast. Next time, mix less, pull it when the center still jiggles, and cool in the oven. If it cracks, cover it with strawberries. No one will know.
Why is my sponge base dense? The eggs were not whipped enough, or you deflated them while folding in flour. Whip to the full ribbon stage and fold gently.
My cheesecake is lumpy: The cream cheese was too cold. Make sure it is completely soft. If you see small lumps, press the batter through a fine mesh sieve before baking.
Water got into my pan: This happens if the foil tears. For next time, use a turkey oven bag around the pan instead of foil, or use the cake pan method described above. For now, chill the cheesecake. The bottom may be a little soggy but the top will still be fine.
Variations to Try
Lemon Strawberry Cheesecake: Add 1 tablespoon lemon zest to the cheesecake batter and replace 2 tablespoons of the sour cream with lemon juice.
Chocolate Drizzle: Melt 3 ounces dark chocolate and drizzle over the finished cake before adding berries.
Mixed Berry Swirl: Use a mix of raspberry and blueberry sauce instead of just strawberry.
Gluten Free: Swap the all purpose flour in the sponge for a 1 to 1 gluten free baking flour blend.
Ricotta Version: Replace 8 ounces of the cream cheese with whole milk ricotta. Drain the ricotta in cheesecloth for 1 hour first so the batter is not too wet. This moves it closer to an Italian style cheesecake.
Make Ahead and Storage
This cheesecake is a great make ahead dessert. You can bake it up to 2 days before serving. Keep it covered in the refrigerator. Add the fresh fruit and powdered sugar the day you plan to serve it. The undressed cheesecake also freezes well. Chill it completely, then wrap the whole cake or individual slices in plastic wrap and a layer of foil. Freeze up to 2 months. Thaw overnight in the refrigerator. Add toppings after thawing.
Leftovers keep for 4 days in the fridge. Store them in an airtight container so the cheesecake does not absorb other flavors.
Frequently Asked Questions
Can I make this without a water bath?
You can, but the texture will be denser and the risk of cracking is higher. If you skip it, place a pan of hot water on the rack below the cheesecake to add some steam to the oven. Bake at 300°F for 50 to 60 minutes.
Can I use frozen strawberries?
For the sauce swirl, yes. Thaw and drain them first, then cook down as directed. For the topping, fresh is best. Frozen berries release too much liquid when they thaw and will make the top weepy.
My springform pan is 8 inches. What do I do?
Use the same amount of batter. The sponge and cheesecake layers will be thicker. Add 5 to 8 minutes to the sponge bake time and 5 to 10 minutes to the cheesecake bake time. Watch for the same visual cues for doneness.
Can I double this recipe?
Not in a home oven. Cheesecake batter is heavy and does not scale easily in one pan. Make two separate 9 inch cheesecakes instead.
How do I know when to stop whipping the eggs for the sponge?
Lift the beaters. The batter should fall back into the bowl in a thick ribbon that sits on the surface for 2 to 3 seconds before sinking. If it sinks immediately, keep beating. This can take 7 minutes with a hand mixer.
Serving Suggestions
Serve this cheesecake cold. The flavors are cleanest that way. It pairs well with a cup of coffee, espresso, or a glass of Moscato d’Asti. For a dinner party, add a small pitcher of extra strawberry sauce on the side so guests can add more if they want. A dollop of lightly sweetened whipped cream is also a good addition, though the cake is plenty rich on its own.
Final Thoughts
This Strawberry Cheesecake with Sponge Cake Crust looks like it came from a bakery, but the process is straightforward when you break it into steps. The sponge base is worth the extra few minutes. It gives you a lighter dessert with a professional finish. Take your time with the mixing and the cooling, and you will be rewarded with clean slices and a texture that is creamy, not heavy. Once you try this version, you may not go back to a crumb crust. If you make it, note what variations you tried and how it turned out. Good baking is about learning what you like and adjusting next time.