
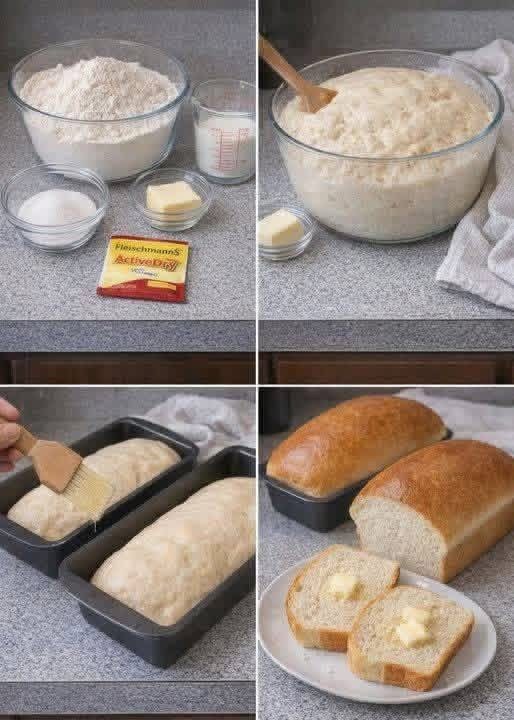
I’ll never buy bread from the store again! This homemade bread is soft, fluffy, buttery, and surprisingly easy to make. It fills the kitchen with the most incredible aroma while baking, and once you taste a warm slice straight from the oven, you may wonder why you ever bothered buying a loaf.
The best part? You don’t need fancy equipment or complicated ingredients. Just a few basic pantry staples, some patience while the dough rises, and a little butter for that irresistible finish.
Whether you’re making sandwiches, toast, breakfast bread, or simply want something warm to serve alongside dinner, this recipe is a keeper.
Why You’ll Love This Homemade Bread
There’s something special about homemade bread.
Store-bought bread can be convenient, but freshly baked bread has a softness, fragrance, and richness that’s difficult to reproduce.
This recipe produces a loaf that is:
- Soft and fluffy inside
- Golden and lightly crisp on the outside
- Buttery and slightly sweet
- Perfect for toast and sandwiches
- Made with simple ingredients
- Excellent served warm with butter
And because you control the ingredients, you know exactly what goes into your loaf.
Ingredients
For the dough, you’ll need:
- 1 cup warm milk
- ½ cup warm water
- 2¼ teaspoons active dry yeast
- ¼ cup sugar
- 2 tablespoons butter, melted
- 1 teaspoon salt
- 4–4½ cups all-purpose flour
For serving:
- Soft butter, for spreading
- Optional: melted butter for brushing the finished loaf
Step 1: Activate the Yeast
Start by combining the warm milk and warm water in a large mixing bowl.
The liquid should be warm but not hot. Extremely hot liquid can damage the yeast.
Add the sugar and active dry yeast. Stir gently and let the mixture stand for about 5–10 minutes.
You should see some bubbles or foam developing on the surface. This is a good indication that the yeast is active.
If nothing happens after several minutes, check that your yeast is still fresh before continuing.
Step 2: Add the Butter and Salt
Once the yeast mixture is ready, stir in the melted butter and salt.
The butter adds richness and helps give the bread its soft texture.
Mix everything together until well combined.
Step 3: Add the Flour Gradually
Begin adding the flour, about one cup at a time.
Stir after each addition.
At first, the dough will look sticky and rough. Continue adding flour gradually until it begins to form a soft dough.
You may not need the full 4½ cups.
This is important because adding too much flour can produce a dense loaf instead of a soft one.
Step 4: Knead the Dough
Transfer the dough to a lightly floured surface.
Knead it for approximately 8–10 minutes, until the dough becomes smooth and elastic.
If the dough is extremely sticky, add a small amount of flour at a time.
Try not to add too much.
A slightly soft dough usually produces softer bread.
If you’re using a stand mixer, you can knead the dough with a dough hook until smooth and elastic.
Step 5: Let the Dough Rise
Place the kneaded dough in a lightly greased bowl.
Turn the dough once so that the surface is lightly coated.
Cover the bowl with a clean kitchen towel or plastic wrap.
Place it somewhere warm and allow it to rise for approximately 1–1½ hours, or until it has roughly doubled in size.
The exact rising time depends on the temperature of your kitchen.
A warmer environment will generally make the dough rise faster.
Step 6: Shape the Loaf
Once the dough has doubled, gently press it down to release excess air.
Transfer it to your work surface and shape it into a loaf.
Place the shaped dough into a greased loaf pan.
Cover it again and allow it to rise for another 30–45 minutes.
The dough should become noticeably puffy.
Step 7: Bake
Preheat your oven to 350°F (175°C).
Bake the bread for approximately 30–35 minutes, or until the top is beautifully golden brown and the loaf sounds hollow when gently tapped.
If the top begins browning too quickly, loosely cover it with aluminum foil for the remaining baking time.
Step 8: Add the Butter
This is the part that makes the bread extra special.
As soon as the loaf comes out of the oven, brush the top generously with melted butter.
The warm bread absorbs some of that buttery flavor while the crust becomes beautifully soft and glossy.
Then comes the hardest part:
Waiting for it to cool enough to slice.
The Best Way to Serve Homemade Bread
For the ultimate experience, slice the bread while it’s still warm and spread it with softened butter.
The butter melts into the soft, fluffy center.
You can also serve this bread with:
- Jam
- Honey
- Peanut butter
- Scrambled eggs
- Soup
- Pasta
- Roasted meats
- Cheese
- Breakfast sandwiches
It’s also fantastic toasted the next morning.
Tips for Perfect Homemade Bread
Don’t Overheat the Milk and Water
Your liquid should feel comfortably warm.
If it’s too hot, the yeast may not work properly.
Don’t Add All the Flour at Once
Start with 4 cups and add more only if needed.
Flour absorbs liquid differently depending on the brand, humidity, and measuring method.
Knead Until Smooth
Proper kneading helps develop gluten, which gives the bread structure and that satisfying stretchy texture.
Give the Dough Enough Time to Rise
Don’t rush the rising process.
The dough should become noticeably larger and airy before you move on to shaping.
Don’t Slice Immediately
Fresh bread continues to release steam after coming out of the oven.
Let it cool for at least 20–30 minutes before slicing if you want cleaner slices.
How to Store Homemade Bread
Once completely cooled, store the bread in an airtight container or bread bag at room temperature.
For the best texture, enjoy it within a few days.
You can also freeze the loaf.
Wrap it tightly in plastic wrap and place it in a freezer-safe bag or container. When you’re ready to eat it, thaw it at room temperature and warm it gently in the oven.
Can You Make This Bread Ahead?
Yes!
You can prepare the dough ahead of time and allow it to rise slowly in the refrigerator.
Cold fermentation can also develop additional flavor.
If you refrigerate the dough, allow it to come closer to room temperature before shaping or baking, depending on how you’ve prepared it.
Final Thoughts
Once you experience the smell of homemade bread baking in your kitchen, it’s hard to go back.
This recipe is simple enough for beginners but delicious enough to become a regular family favorite. The combination of warm milk, butter, yeast, and flour creates a soft, fluffy loaf with a beautiful golden crust.
And don’t forget the most important part:
Serve it warm with plenty of butter.
One bite of that soft, freshly baked bread and you might understand why homemade bread tastes so much better.