
Crispy Creamy Chicken Roll-Ups (Ultimate Gourmet Home Recipe Guide)
Crispy Creamy Chicken Roll-Ups are a rich, comforting, and flavor-packed dish that combines juicy chicken, a creamy cheesy filling, and a golden crispy coating. This recipe is designed to deliver restaurant-quality results at home, with a crunchy exterior and a soft, creamy center that melts in every bite.
This detailed guide explains everything you need to know: ingredient roles, preparation techniques, rolling and stuffing methods, frying or baking options, troubleshooting tips, variations, and storage instructions. Whether you are cooking for family, guests, or meal prep, this dish is a guaranteed crowd-pleaser.
Introduction to Crispy Creamy Chicken Roll-Ups
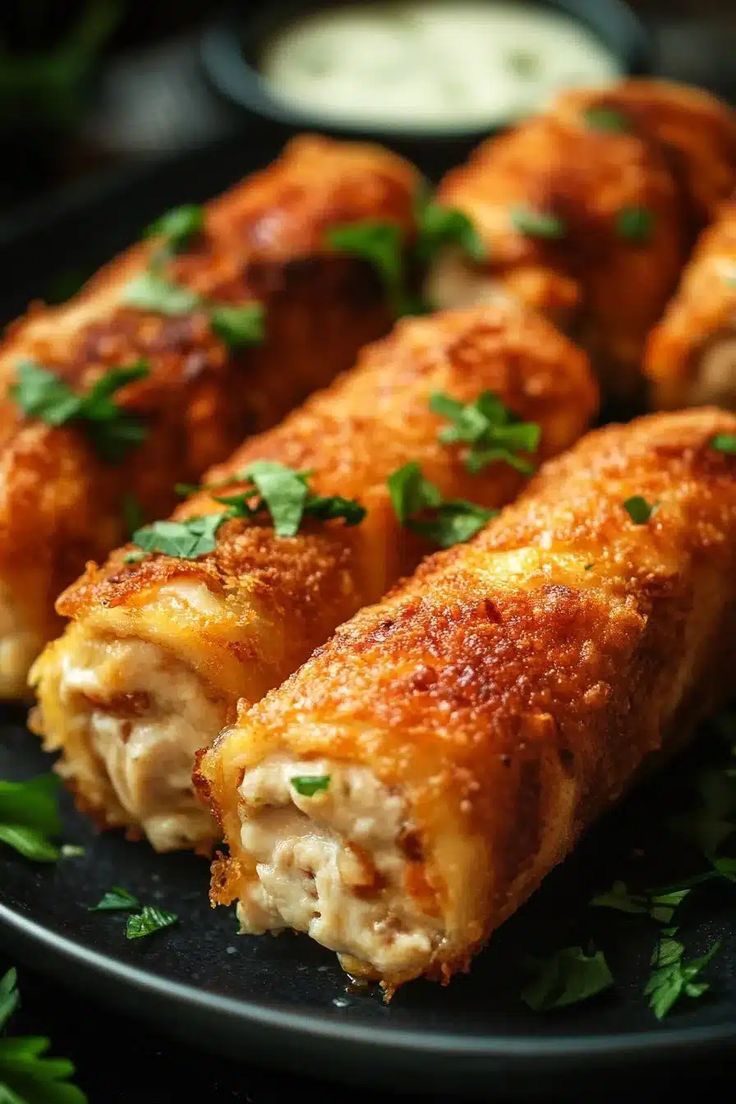
Chicken roll-ups are a versatile dish found in many cuisines, but this version focuses on a crispy breaded exterior combined with a creamy cheese-based filling. The contrast between textures is what makes it special.
Inside, you get tender chicken wrapped around a smooth, cheesy, garlic-infused filling. Outside, you get a crunchy golden crust that locks in moisture and flavor.
The result is:
- Juicy chicken on the inside
- Creamy, cheesy filling in the center
- Crispy, golden coating on the outside
This combination makes the dish ideal for lunches, dinners, party platters, or special occasions.
Ingredients and Their Roles
Understanding each ingredient helps you achieve consistent and high-quality results.
Chicken breast
Chicken breast is the main protein. It should be sliced and flattened to ensure even cooking and easy rolling. Proper preparation keeps the meat tender and juicy.
Cream cheese
Cream cheese creates a rich and creamy filling. It provides smooth texture and a mild tang that balances the savory chicken.
Milk
Milk helps soften the cream cheese mixture, making it easier to spread and giving it a lighter texture.
Butter
Butter adds richness and depth of flavor to both the filling and optional cooking base.
All-purpose flour
Flour is used for coating. It helps the egg mixture stick properly to the chicken before breading.
Eggs
Eggs act as a binding layer between flour and breadcrumbs, ensuring the coating stays intact during cooking.
Bread crumbs
Breadcrumbs create the crispy outer layer. They are essential for achieving a golden crunch.
Mozzarella cheese
Mozzarella adds a stretchy, melty texture inside the roll-ups. It enhances creaminess and flavor.
Garlic powder
Garlic powder gives a subtle savory aroma that enhances the filling and coating.
Onion powder
Onion powder adds depth and enhances the overall flavor profile.
Salt
Salt balances all ingredients and enhances taste.
Black pepper
Black pepper adds mild heat and sharpness.
Parsley
Parsley adds freshness and a light herbal note.
Paprika
Paprika gives color and a mild smoky flavor.
Oil
Oil is used for frying or brushing before baking to achieve crispiness.
Equipment Needed
To prepare Crispy Creamy Chicken Roll-Ups, you will need:
- Cutting board
- Sharp knife
- Meat mallet or rolling pin
- Mixing bowls
- Frying pan or baking tray
- Toothpicks or kitchen twine
- Measuring spoons
- Tongs
- Paper towels
Proper tools help ensure even cooking and safe handling.
Preparing the Chicken
Step 1: Slice and flatten
Chicken breasts should be sliced horizontally into thinner pieces or butterflied. Then gently flatten using a meat mallet until even in thickness.
This ensures:
- Even cooking
- Easy rolling
- Tender texture
Step 2: Season the chicken
Lightly season both sides with salt, black pepper, garlic powder, onion powder, and paprika. This step builds flavor from the inside out.
Preparing the Creamy Filling
Step 1: Mix base ingredients
In a bowl, combine:
- Cream cheese
- Milk
- Mozzarella cheese
- Garlic powder
- Onion powder
- Parsley
Mix until smooth and creamy.
Step 2: Adjust consistency
The filling should be thick but spreadable. If too thick, add a small amount of milk.
Assembling the Roll-Ups
Step 1: Spread filling
Place flattened chicken on a clean surface and spread a layer of creamy filling evenly.
Step 2: Roll tightly
Roll the chicken carefully from one end to the other. Keep it tight to prevent filling from leaking.
Step 3: Secure
Use toothpicks or kitchen twine to hold the roll in place.
Breading Process
Step 1: Flour coating
Lightly coat each chicken roll in flour. This helps the egg stick better.
Step 2: Egg wash
Dip the floured roll into beaten eggs, ensuring full coverage.
Step 3: Breadcrumb coating
Roll in breadcrumbs until fully coated. Press gently to ensure coating sticks well.
For extra crispiness, repeat egg and breadcrumb coating a second time.
Cooking Methods
You can cook these roll-ups in two ways: frying or baking.
Method 1: Frying
Step 1: Heat oil
Heat oil in a pan over medium heat.
Step 2: Cook roll-ups
Place chicken roll-ups in hot oil and cook until golden brown on all sides.
Step 3: Drain
Remove and place on paper towels to remove excess oil.
Frying gives the crispiest texture and richest flavor.
Method 2: Baking
Step 1: Preheat oven
Preheat oven to 200°C (400°F).
Step 2: Prepare tray
Place roll-ups on a greased baking tray. Lightly brush with oil.
Step 3: Bake
Bake until golden and fully cooked inside.
Baking is a healthier alternative with slightly less crispiness.
Checking Doneness
Chicken is fully cooked when:
- Internal temperature reaches safe level
- Juice runs clear when cut
- No pink color remains inside
Resting the Chicken
Allow roll-ups to rest for a few minutes before cutting. This helps juices redistribute and keeps the filling intact.
Serving Suggestions
Crispy Creamy Chicken Roll-Ups can be served with:
- Mashed potatoes
- Rice
- Fresh salad
- Garlic sauce
- Yogurt dip
- Steamed vegetables
They are versatile and fit many meal styles.
Tips for Best Results
Flatten evenly
Uneven chicken cooks unevenly and may tear during rolling.
Do not overfill
Too much filling can cause leakage during cooking.
Seal tightly
Proper rolling prevents filling from escaping.
Double coating for crispiness
A second breadcrumb layer creates extra crunch.
Control oil temperature
Too hot oil burns coating; too cold oil makes it soggy.
Common Problems and Solutions
Filling leaks out
Cause: Overfilling or loose rolling
Solution: Use less filling and roll tightly
Coating falls off
Cause: Missing flour or egg layer
Solution: Follow full breading process
Chicken is dry
Cause: Overcooking
Solution: Monitor cooking time carefully
Not crispy enough
Cause: Low oil temperature or no oil spray (baking)
Solution: Ensure correct heat level or brush oil before baking
Variations
1. Spicy Chicken Roll-Ups
Add chili flakes or hot sauce to filling.
2. Cheesy Herb Roll-Ups
Add extra mozzarella and fresh herbs.
3. Mushroom Chicken Roll-Ups
Add sautéed mushrooms to filling.
4. Spinach Chicken Roll-Ups
Add cooked spinach for a healthier version.
5. BBQ Chicken Roll-Ups
Add barbecue sauce inside for smoky flavor.
Storage Instructions
- Refrigerator: up to 3 days in airtight container
- Freezer: up to 2 months (before or after cooking)
Reheat in oven or air fryer for best texture.
Reheating Tips
- Oven: 180°C until heated through
- Air fryer: best for restoring crispiness
- Avoid microwave for crispy texture
Nutritional Overview (Approximate)
- Calories: High due to cheese and frying
- Protein: High from chicken
- Fat: Moderate to high
- Carbohydrates: Moderate from breading
This is a rich comfort food best enjoyed in balance.
Final Thoughts
Crispy Creamy Chicken Roll-Ups combine everything people love in comfort food: crunchy coating, juicy chicken, and a rich cheesy filling. The recipe is flexible, allowing baking or frying, and can be customized with different flavors and fillings.
Success comes from careful preparation: flattening chicken properly, balancing the filling, and using a correct breading technique. Once mastered, this dish becomes a go-to recipe for both everyday meals and special occasions.